Click the links that follow to learn more about each additional tab:
requires that consent is explicitly granted by the to its to initiate payments from the user's account or to access the user's account information. You, as the TPP, can configure a Display Name which will be presented to the user when he/she is redirected to the bank for authentication and authorization. This allows the bank to ensure that the user can readily identify the TPP initiating the payment/access request. Your display name should be in a form that your customers will easily recognize when they are asked to provide consent. Your member ID will be used by default if you do not provide a display name.
Expand Settings in the navigator, click Configuration, then select the General tab.
As mentioned previously, your member ID appears by default.
Click in the input field for Display Name 1 and enter your desired primary display name.
Click in the input field for Display Name 2 to enter an optional secondary display name.
Click Save to record this configuration.
Under this tab you set the reseller-default webhook URL and triggering events.
A webhook subscribes the TPP to certain events, which, when triggered, send a webhook event payload in a POST message to the configured URL in real time. Webhook events are triggered when there is a change in status for a single transfer, a refund, a standing order, a variable recurring payment, or a variable recurring payment consent — TRANSFER_STATUS_CHANGED, REFUND_STATUS_CHANGED, STANDING_ORDER_STATUS_CHANGED, VRP_STATUS_CHANGED, and VRP_CONSENT_STATUS_CHANGED, respectively.
Here's the practical application of a Token.io webhook.
When a payment is initiated, the TPP will need to determine if/when the payment requested is successful in order to notify the user of the transfer's status and take appropriate next steps, such as sending the user a receipt for payment or, if the transfer did not succeed, advising the customer with respect to a payment collection alternative before cancelling the purchase altogether. Why is this important?
In some cases, completion of a payment initiation response from the bank takes longer than expected for reasons beyond the control of either the TPP, the reseller or Token.io, resulting in a delay in receiving the transfer status from the bank, whether successful or rejected. While awaiting the transfer status in the bank's response to the original transfer request, the TPP could either continuously poll for an update on status, involving multiple calls made periodically, or it can rely on a Token.io webhook.
The webhook avoids protracted polling calls by the TPP for updates. Instead, upon any change in transfer status (the trigger), your Webhook URL immediately receives an HTTP POST message from containing the transfer status payload. During the interim, Token.io polls the bank is polled for updates on the current status of the transfer so you don't have to. Here's the basic flow (click to enlarge):
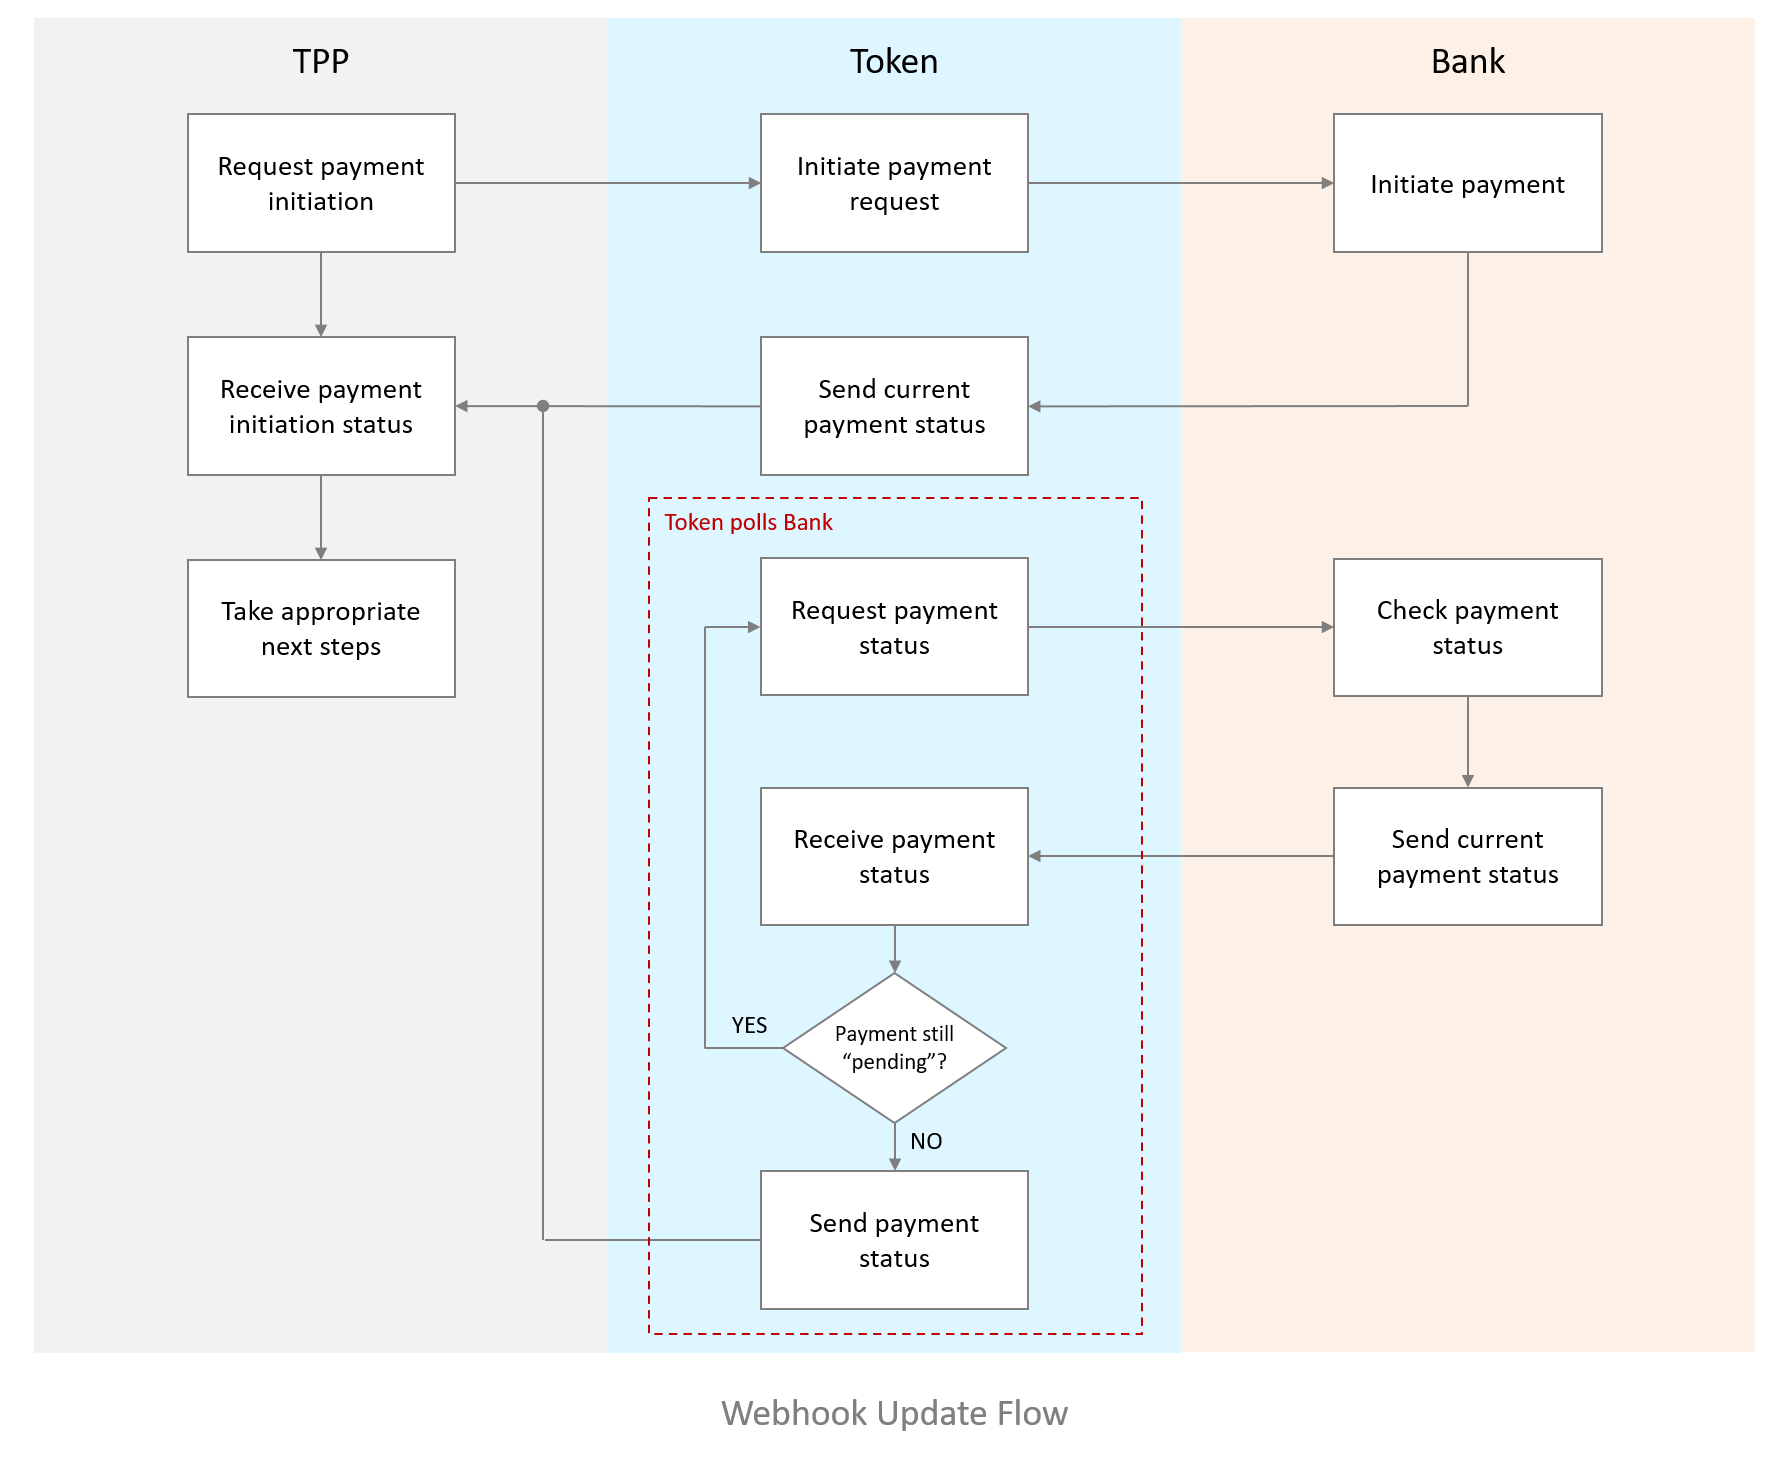
Note: The webhook is sent only when the transfer status returned by the bank is transitional; i.e., processing. When the status is conclusively final — either success or failure — the webhook is not sent. See Payment Initiation Status for the complete list of transfer states.
The message Headers received by your Webhook URL comprise the following:
| Headers | Description |
|---|---|
| Token.io-Event | Name of the event type that triggered the delivery (e.g., Transfer) |
| Token.io-Signature | Authenticates Token.io as the sender of the message and ensures that particular headers have not been modified in transit |
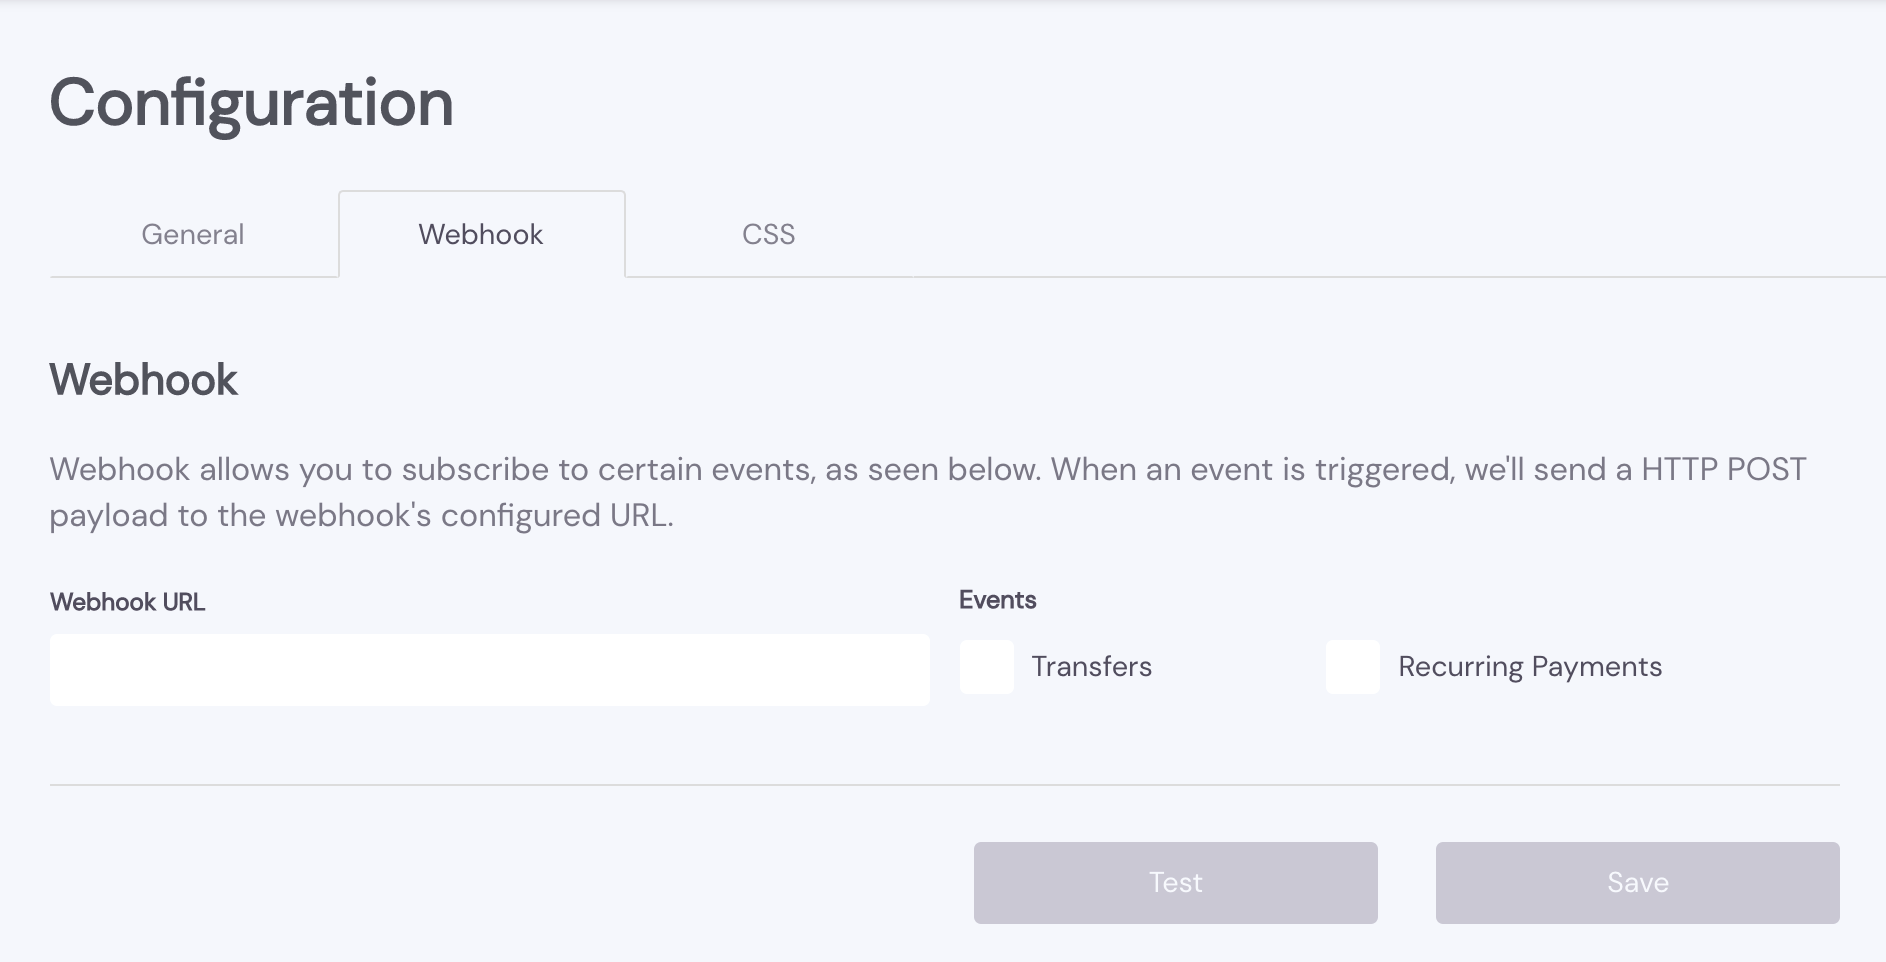
Expand Settings in the navigator and click Configuration, then select the Webhook tab.
Enter the Webhook URL that will receive the updated status; e.g., https://yourWebServer.yourCompany.com.
Select the Events that will trigger an update (you may select more than one) — e.g., select Transfers.
Click Save to store your entries/changes.
Click Test to validate the Webhook URL.
Click Okay to acknowledge the Event generated message. It confirms the URL to which the Webhook event has been sent and advises receipt within 1 to 3 minutes.
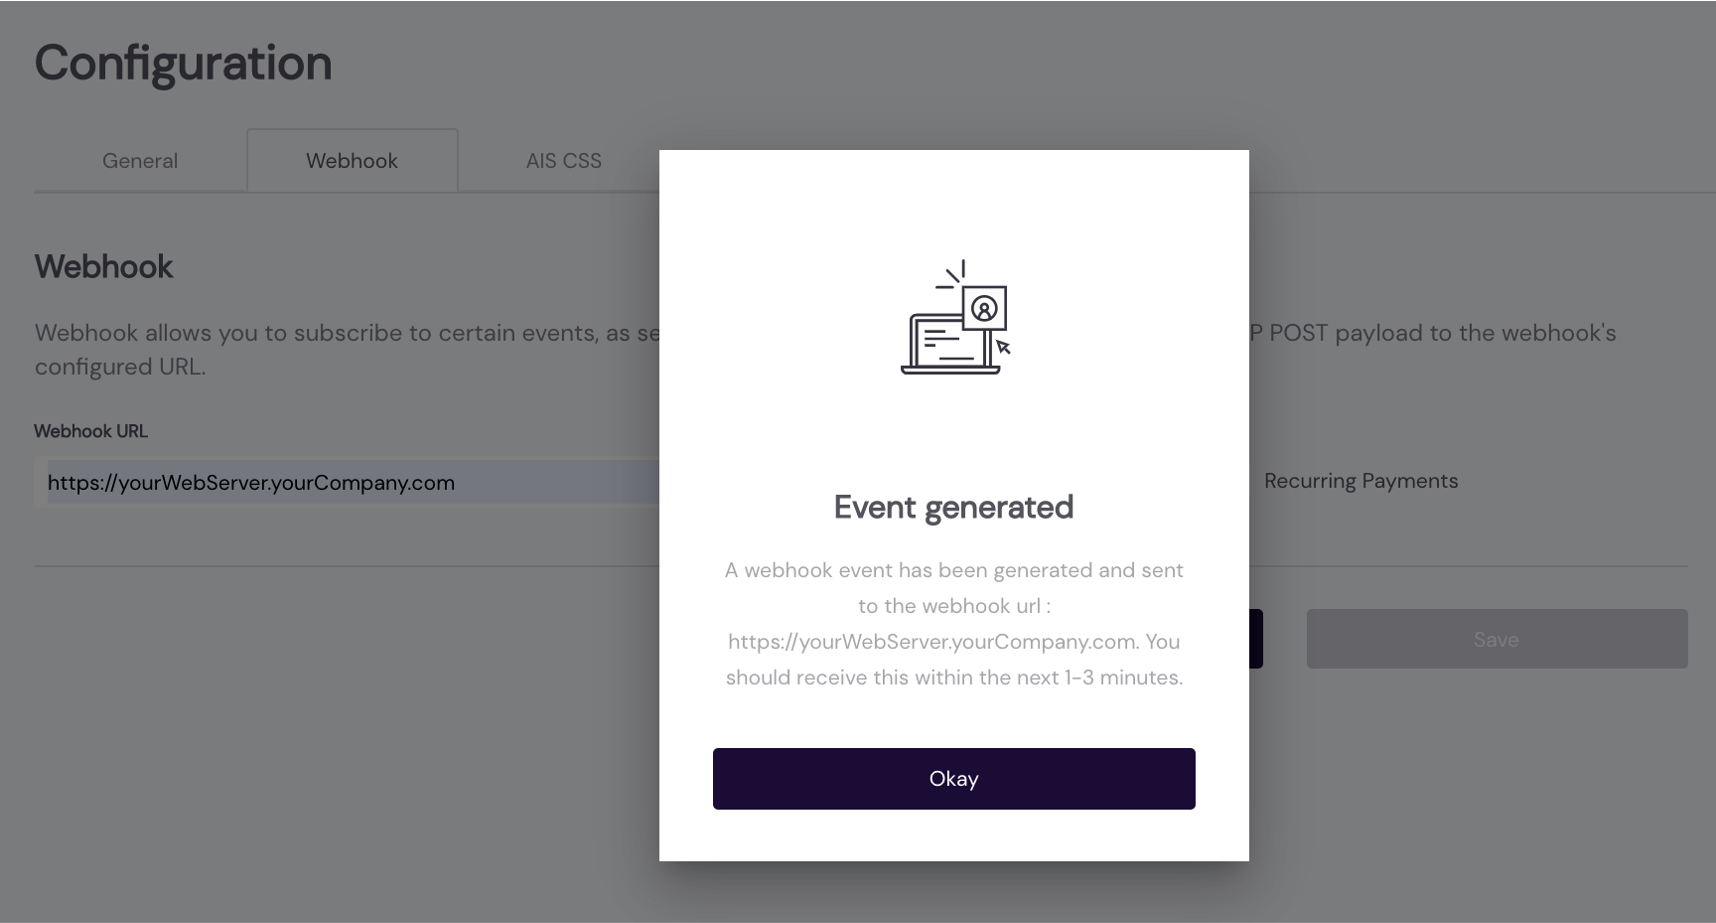
Finally, check that your Webhook URL received the event message (HTTP POST).
Select the Webhook tab.
Enter the Webhook URL that will receive the updated status; e.g., https://yourWebServer.yourCompany.com.
Select the Events that will trigger an update.
Click Save to store your entries/changes.
Click Test to validate the Webhook URL.
Click Okay to acknowledge the Event generated message. It confirms the URL to which the Webhook event has been sent and advises receipt within 1 to 3 minutes.
Verify that the configured Webhook URL actually received the event message (HTTP POST).
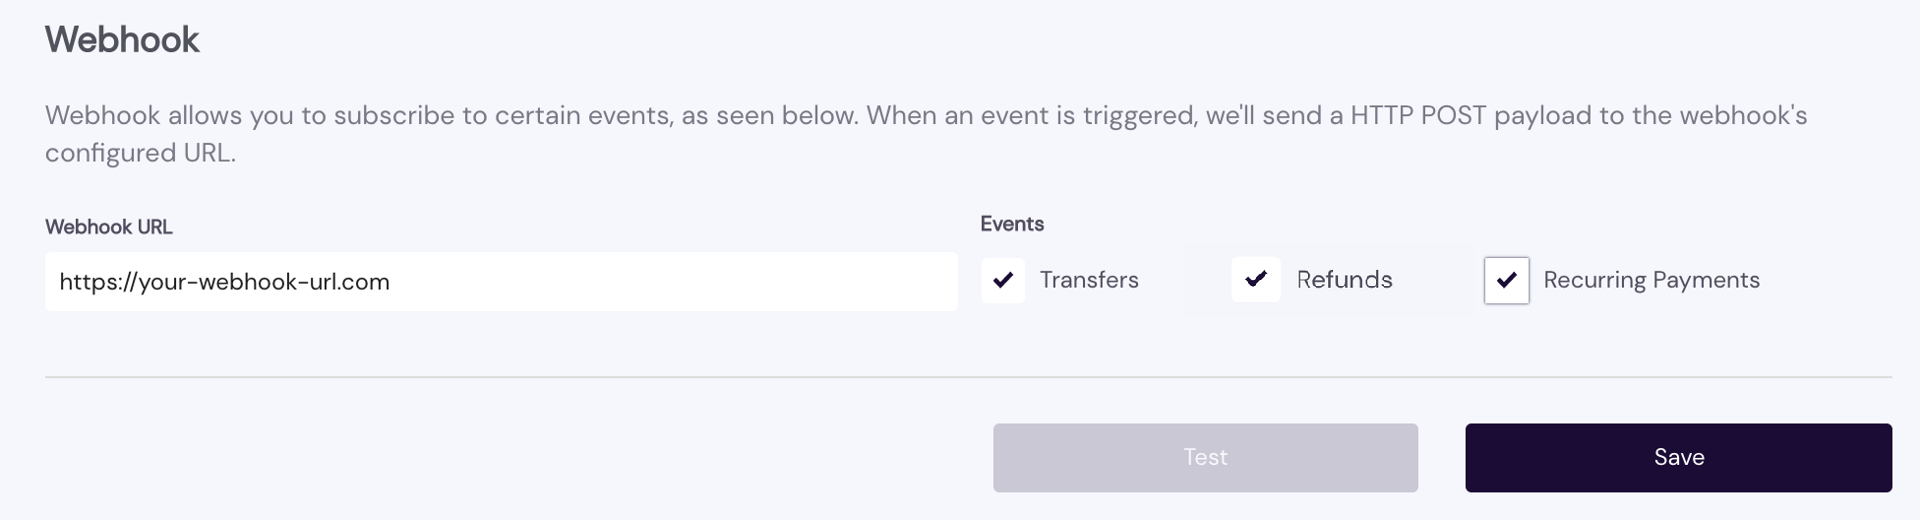
You can configure the webhook to receive notifications for transfers, refunds, standing order submissions, and variable recurring payment initiations.
The notification will contain a transactionId (optional, depending on bank support), transferId, refId, and the current transfer status. At the bank's option, it may include the original payment status in bankPaymentStatus or bankStandingOrderStatus, respectively. For a list of possible transfer states, see Payment initiation status.
Under this tab you control with which banks the selected TPP is permitted to initiate Open Banking requests. Only the banks you configure for this TPP will be available for user selection in the Hosted Pages
If you're using your own license: The list of countries and banks displayed for user selection depends on the bank registration and configuration you manage from the dashboard using Settings > Certificate Management > Bank Configuration. Remember, only the banks you configure for this TPP will be available for user selection in the Hosted Pages.
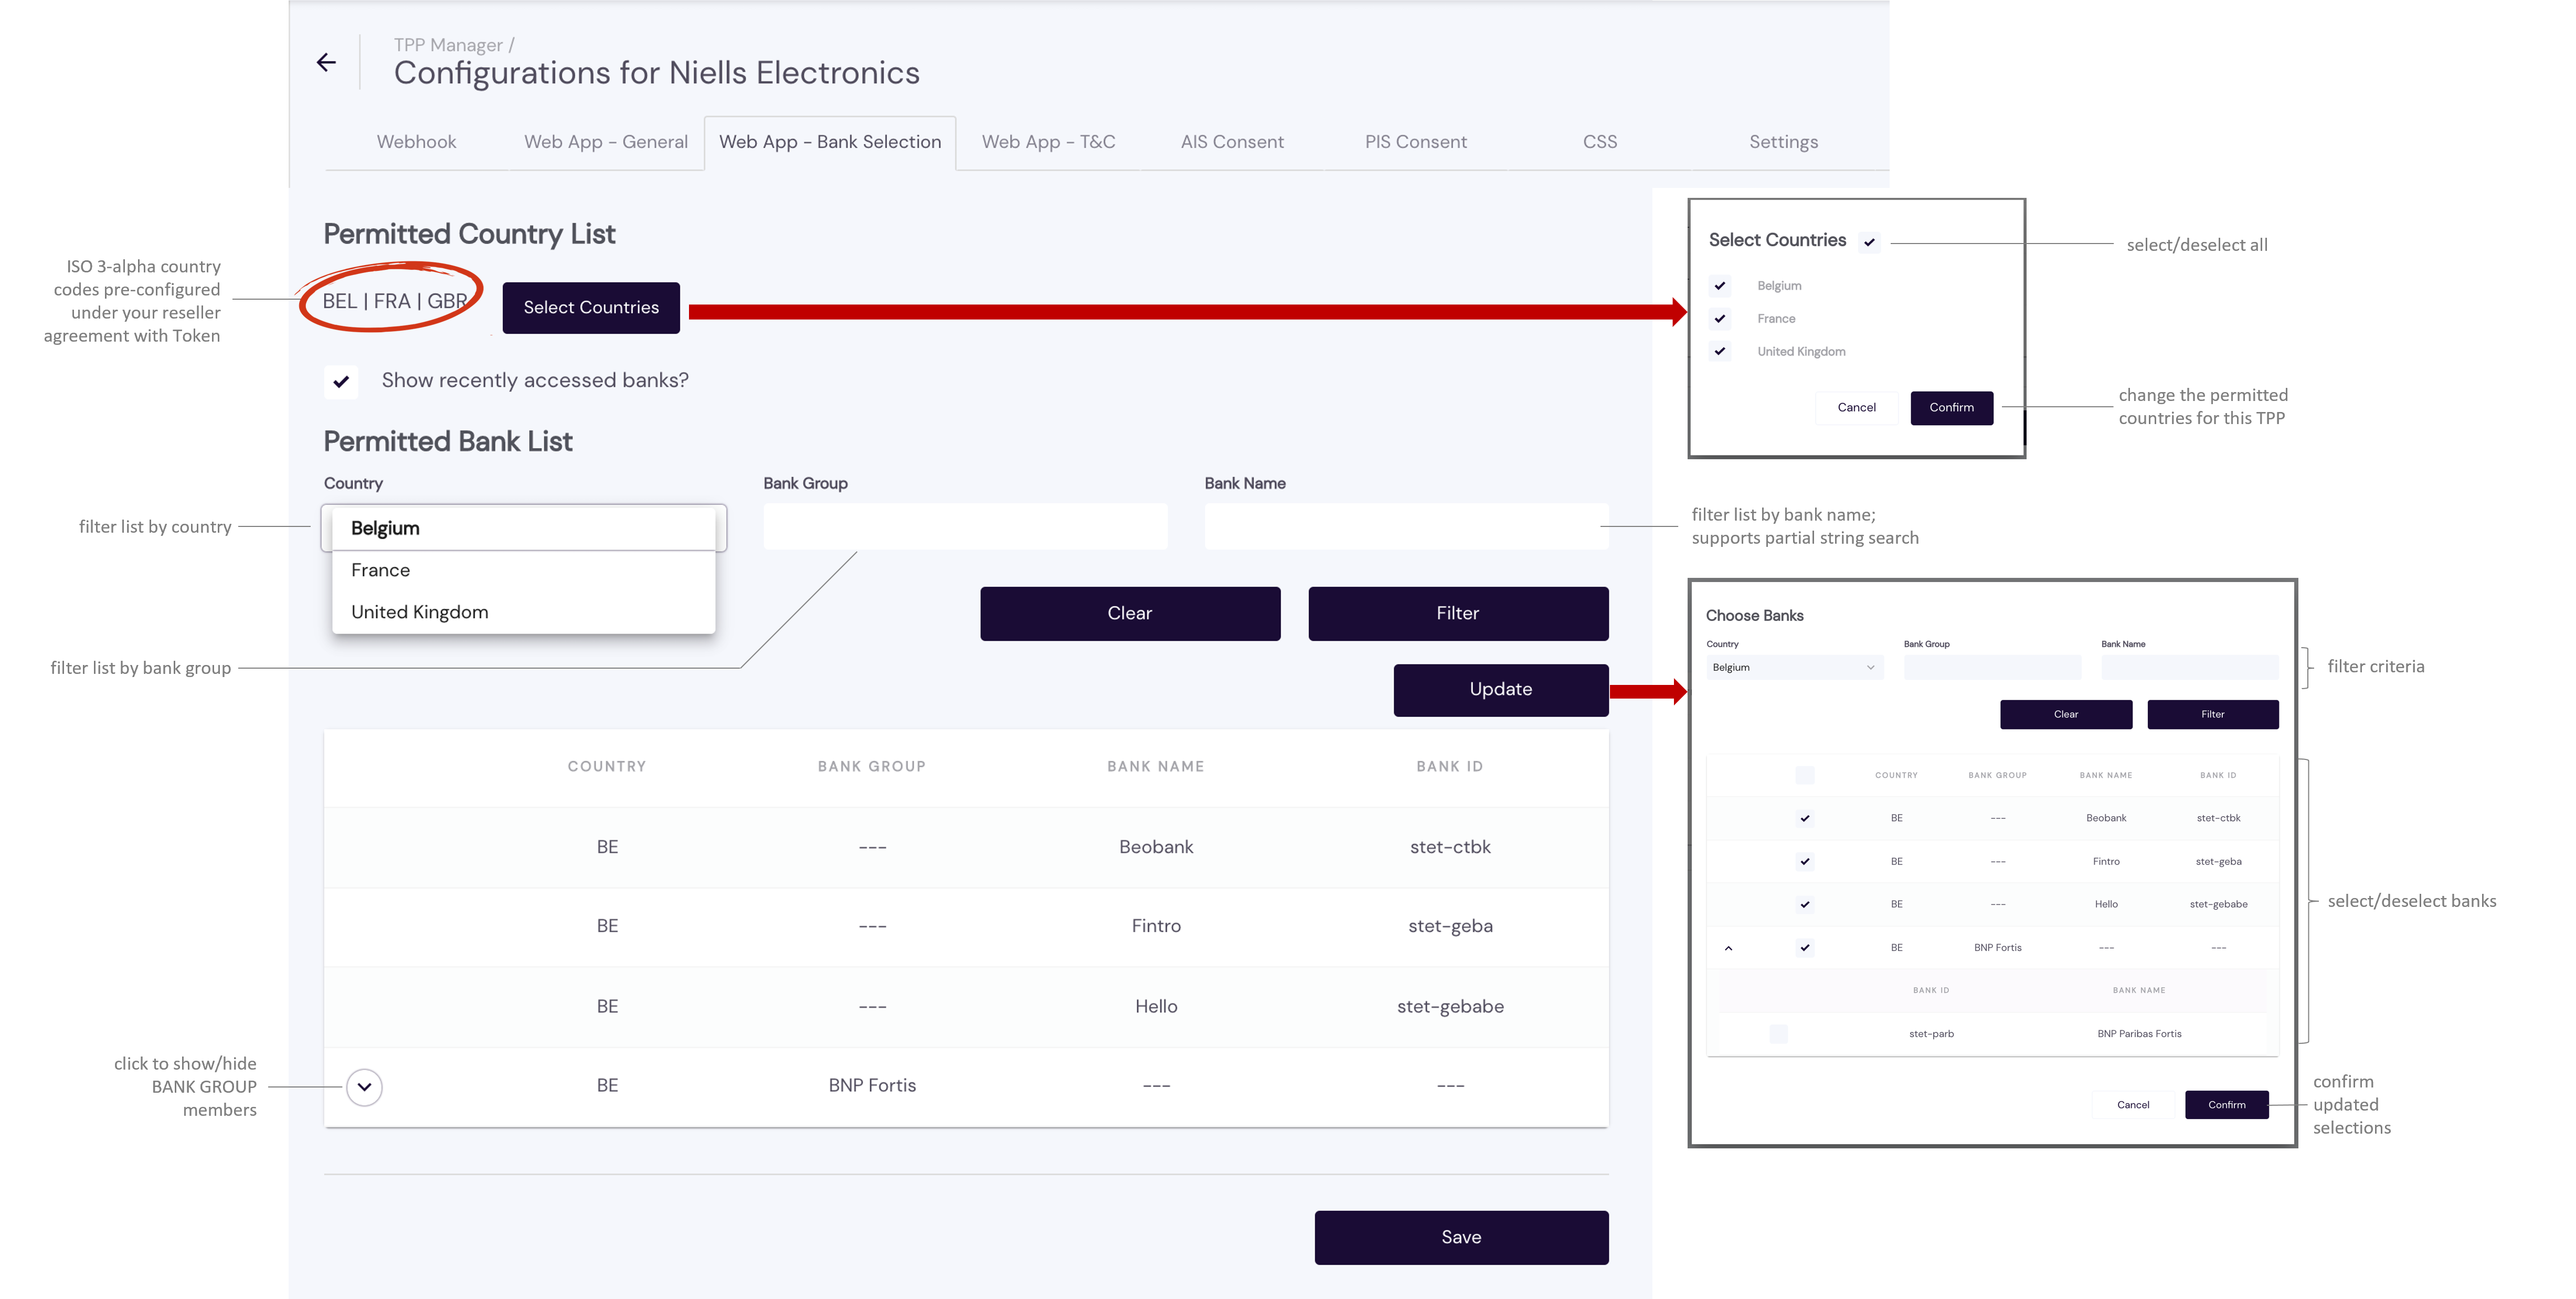
Be sure to save your changes.
Under this tab, you can control the CSS color scheme applied to the Hosted Pages for the selected TPP in accordance with itsyour corporate branding guidelines and requirements.
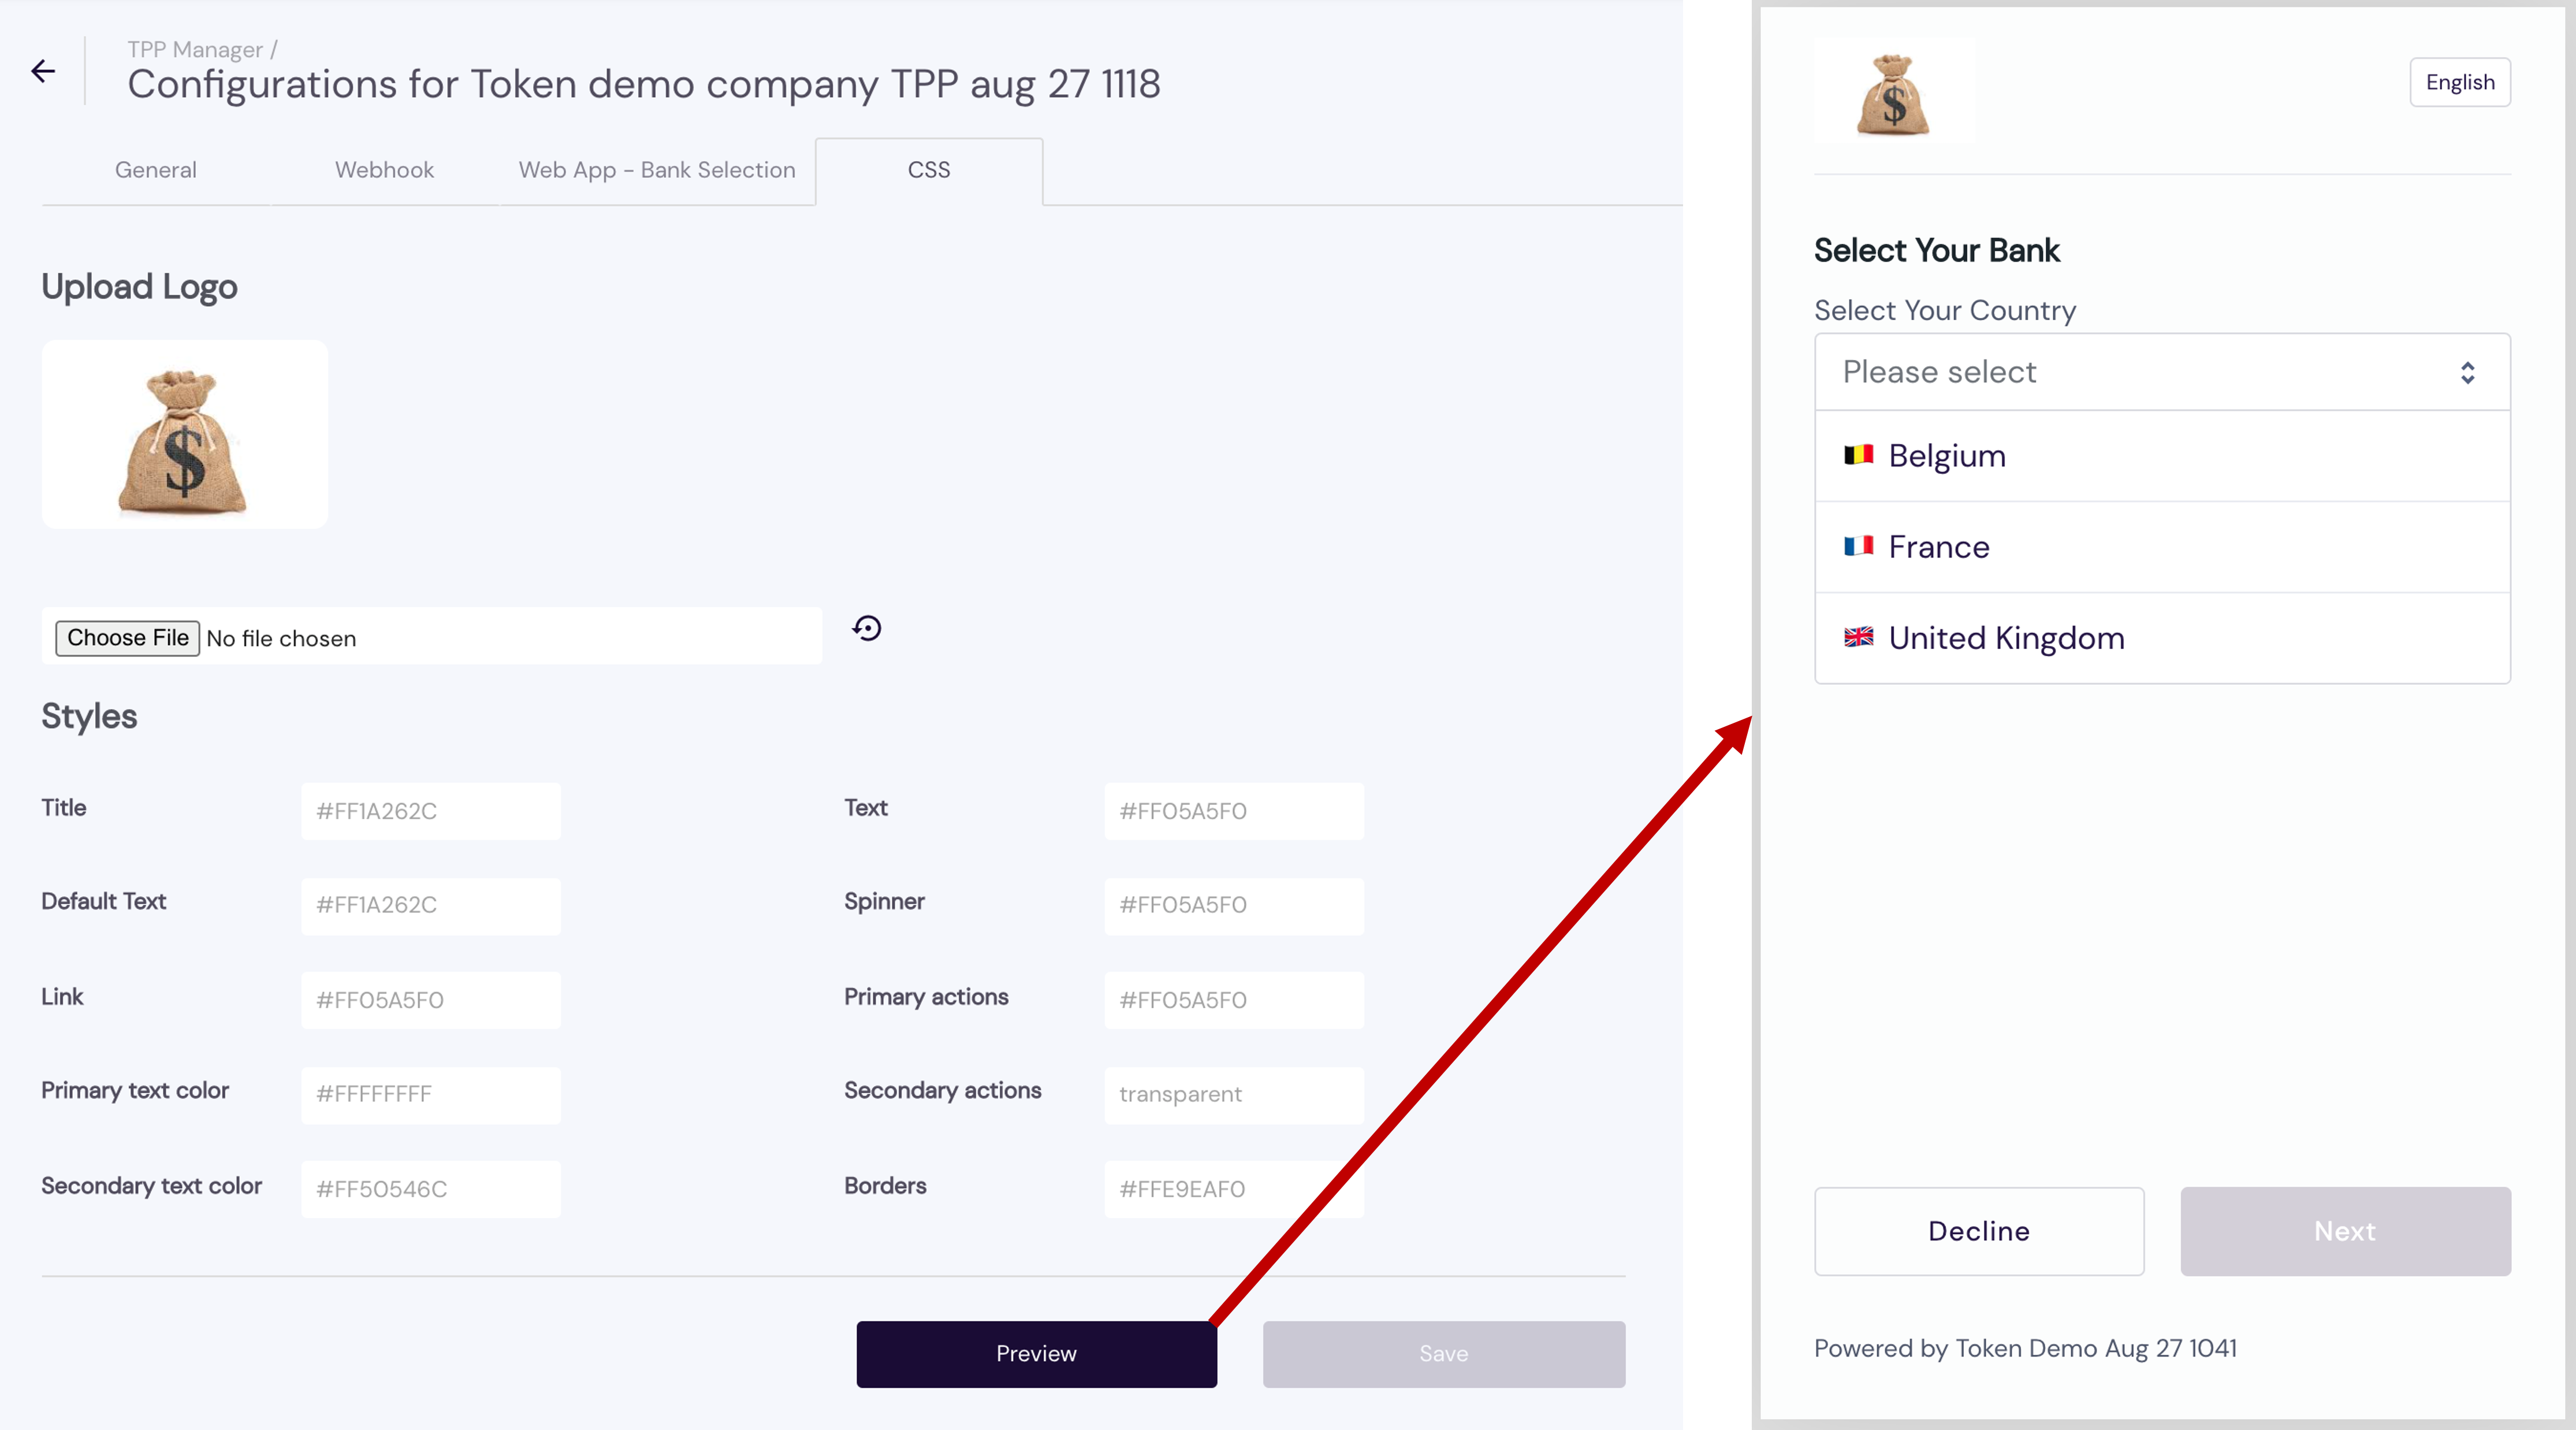
Click Preview to see how the custom CSS looks when applied in the Hosted Pages. When you are transferred to Payload Builder, follow these preliminary setup steps to initiate a test request with a redirect to the Hosted Pages:
- Choose a Request Type – Data, Single Payment or Recurring Payment.
If you choose Data, select at least one of the account access Parameters — Balance, Transactions. - Enter a notional Ref Id, like "testrequest" or some other unique alpha-string.
- Provide a Callback URL. For our purposes here, use "google.com."
- Click Generate, then click Test and wait for the Hosted Pages UI to appear.
For more on Payload Builder, see Use Payload Builder to Generate an Authentication Link.
If you have any feedback about the developer documentation, please contact devdocs@token.io