From the Token.io Dashboard, you can:
You can also access the latest API documentation and the list of connected banks, view demos of account information and payment initiation solutions, and contact Token.io Support.
You will need a dashboard account to sign in and access its many features. Go to https://dashboard.token.io/signin to get started. Here's what you'll see:

Already have an account?
- Provide your Email and Password in the fields provided, then click Sign In. Want the dashboard to remember you? Click the Remember me checkbox.
Can't remember your password? Click Forgot Password, provide your Email address, confirm that you are not a robot, click Next, then click Okay and check your email. Then, in the email you receive from Token.io, click Confirm account and sign in with your new password.
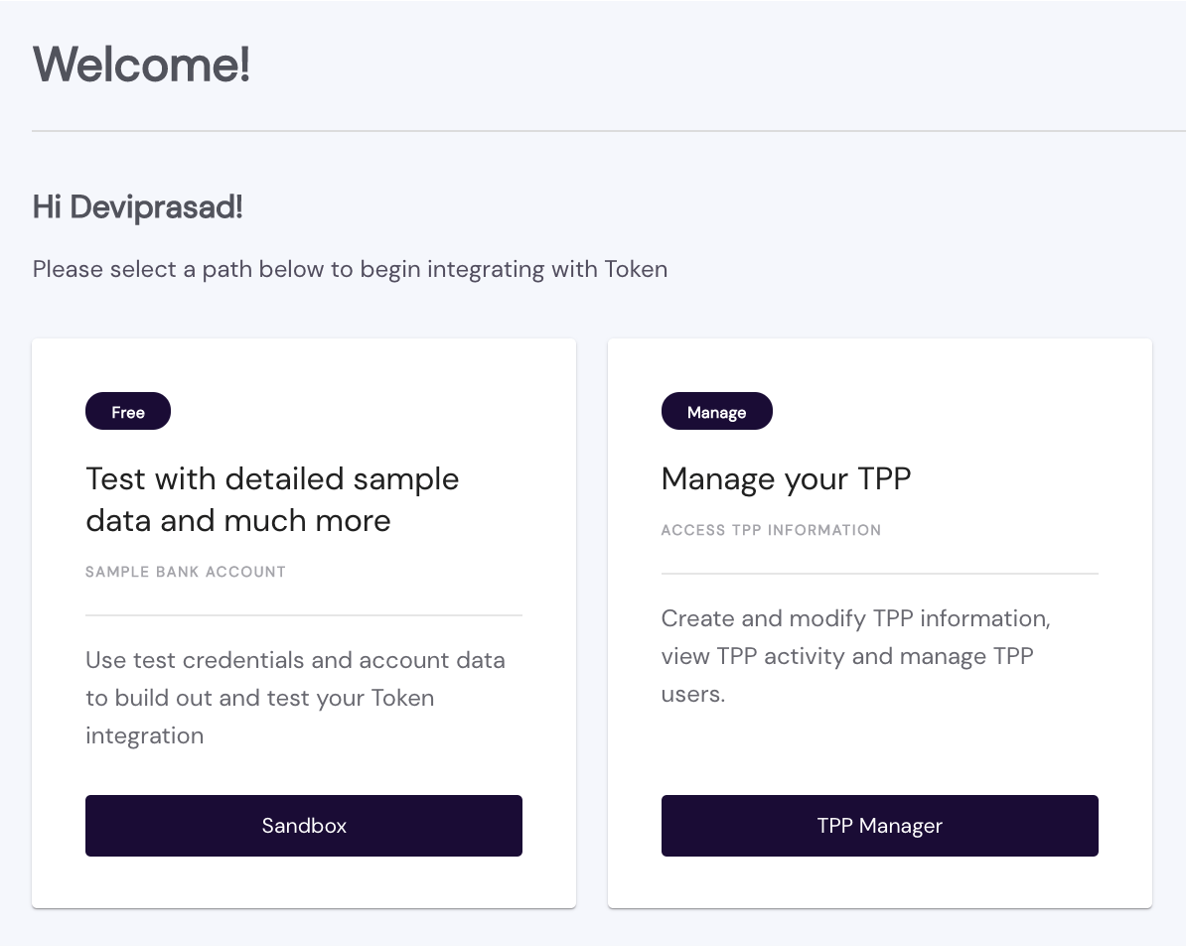
Click Sign In. You'll be taken to the Dashboard page and given the option of navigating to TPP Manager or Sandbox.
Click TPP Manager to create and modify TPP information, view TPP activity and manage TPP users. Or, you can click Sandbox to enter our testing environment first.
Need to create an account?
Click Register on the bottom-left of the screen (or click Sign Up in the upper-right), then fill-in the form, as follows:
Enter your name and company contact information.
Select the Application service(s) you want to use.
Check Data for the Account Information Service (AIS) and/or Payments for the Payment Initiation Service (PIS).Enter a Password conforming to the rules listed, then indicate your acceptance of Token.io's terms and privacy policy by checking the corresponding box.
Click Create Account.
Confirm your email.
Sign In.
On the next prompt, Are you an existing member?, if you have already registered a Member ID using the Token.io SDK for TPPs, enter your Member ID and click Yes. If you are a new Token.io member and do not yet have a Member ID, click No.
When asked whether you will need to use Token.io's TPP license, click I'll do this later. This displays your personalised Welcome! screen.
Click Sandbox to enter our test environment.
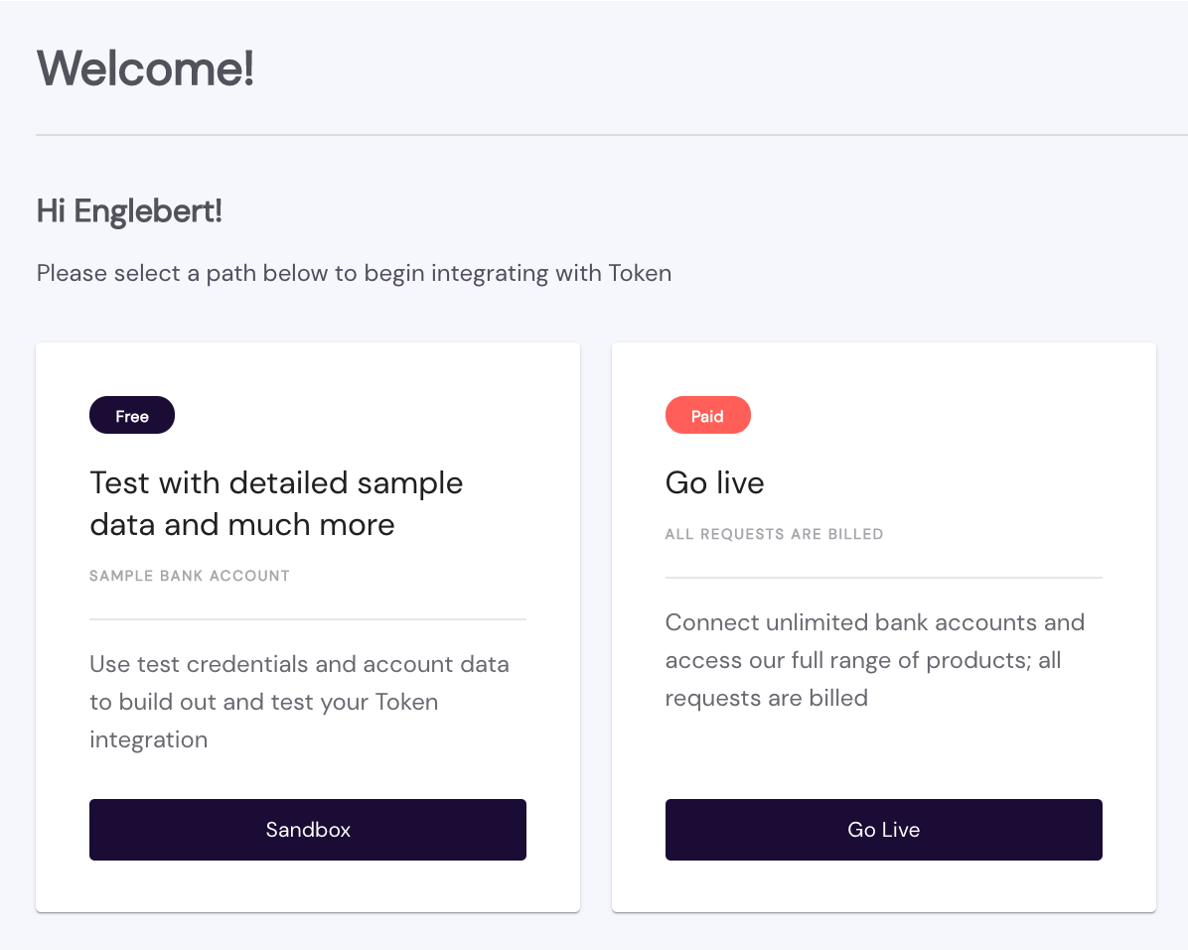
Here, as indicated, you'll use test credentials and account data to build out and test your Token.io integration.
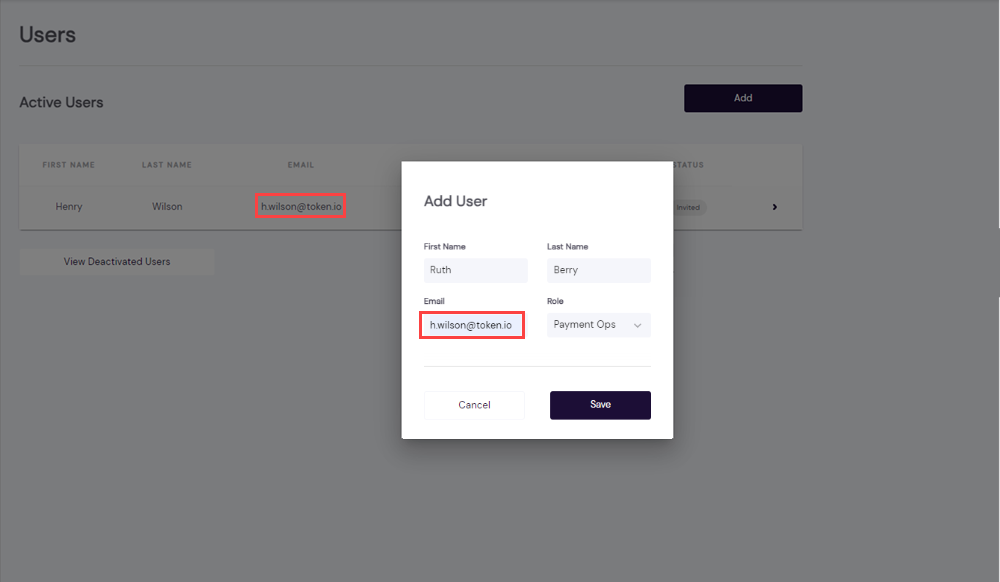
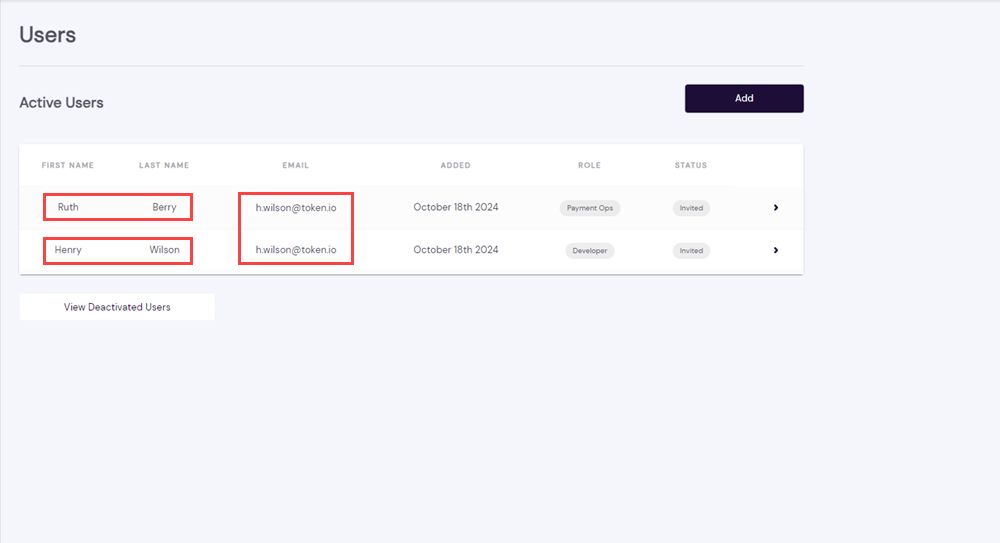
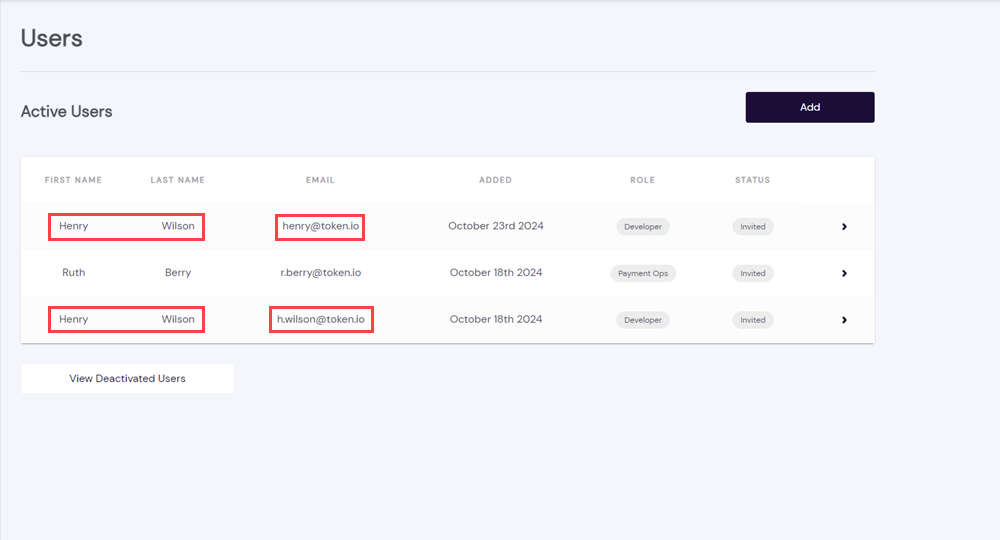
When adding a new user to the Dashboard, the email address does not need to be unique; it can be the same as the email address used by another user for an existing Dashboard account. This allows you to use the same email address to access multiple Token.io Dashboard accounts from a single login.
The following images show a new user being added to the dashboard with the same email address as an existing user.
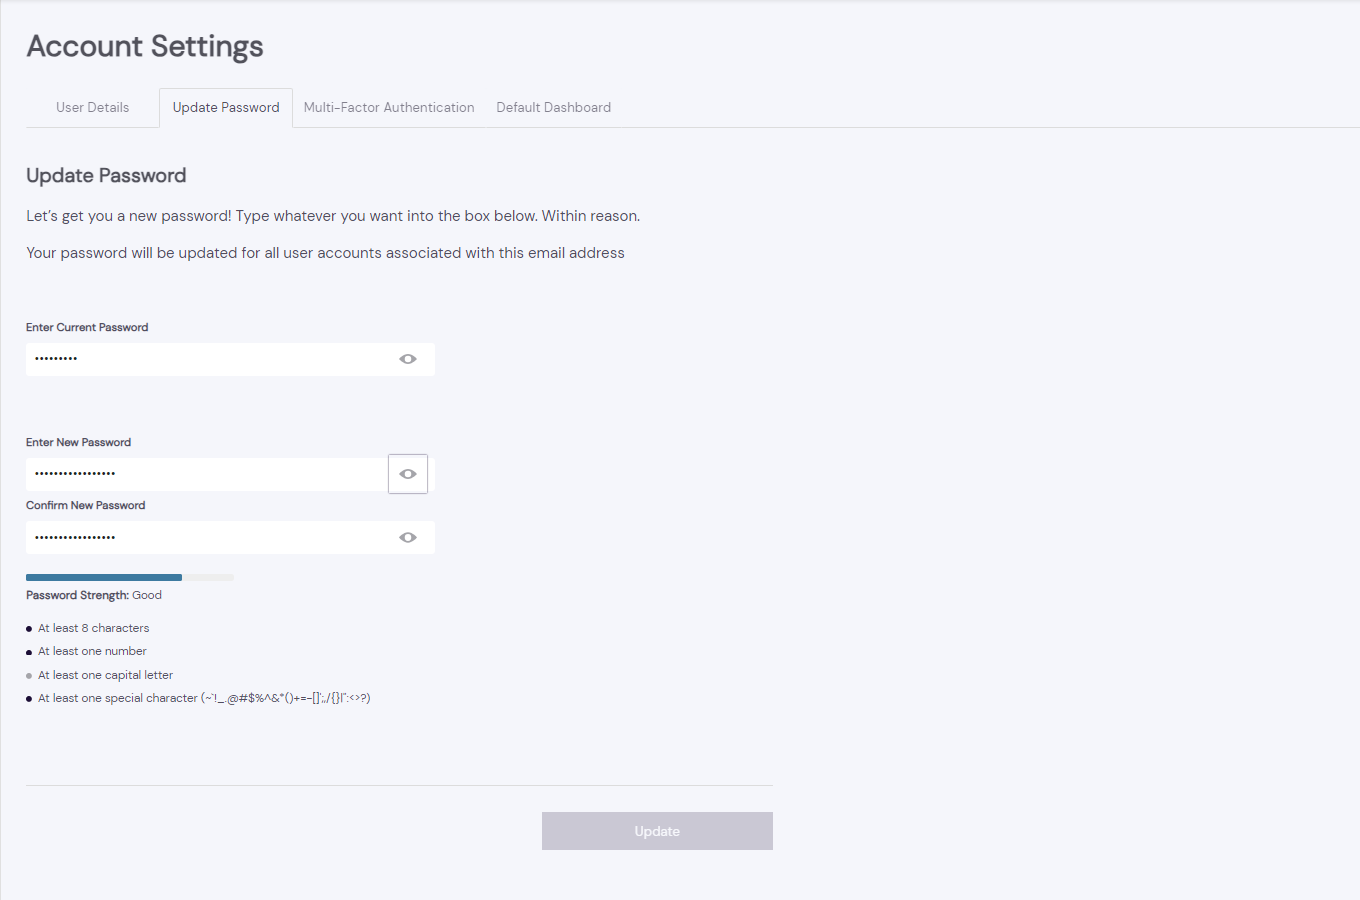
You may need to synchronize the passwords for accounts with the same email address so that you can access the Dashboard accounts from the same login.
Navigate to Settings > Account Settings > Update Password to reset and synchronise your passwords.
If you have issues resetting your password, these can be resolved by clearing your browser cache or using Incognito.
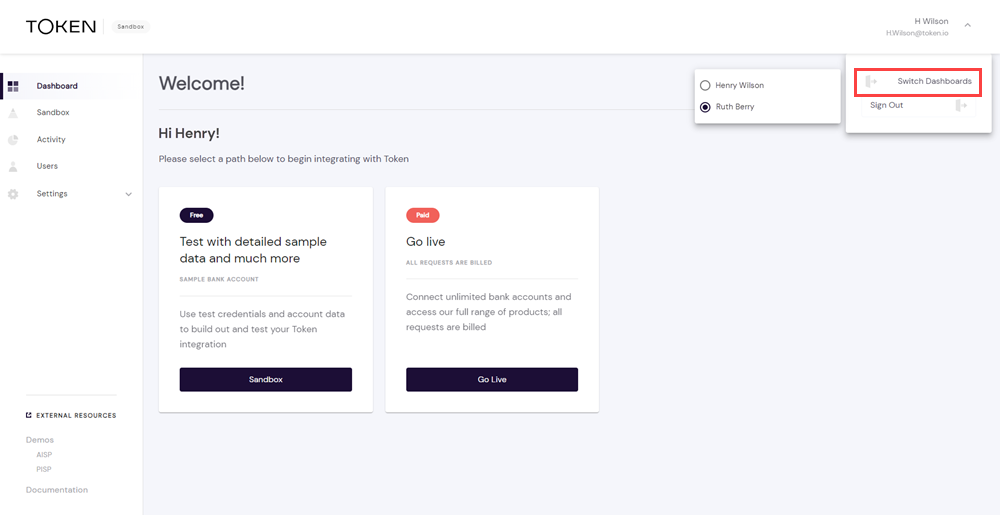
Once Dashboard accounts with the same email address have been set up, you can switch between them using the menu in the top right of the screen.
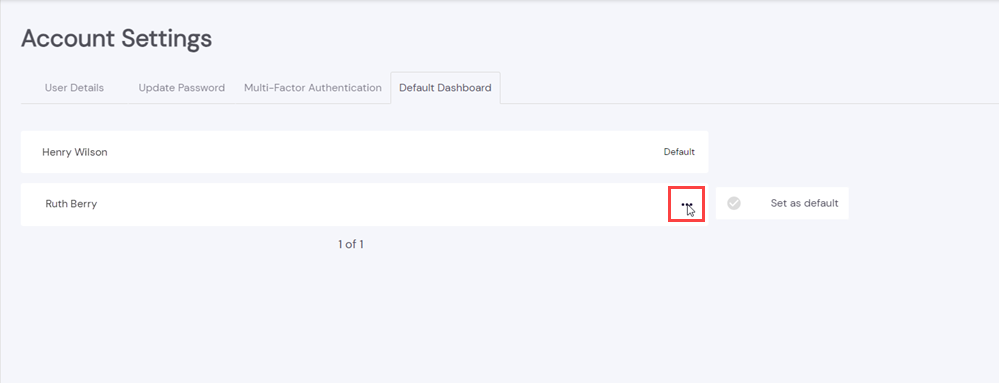
By navigating to Settings > Account Settings > Default Dashboard, and clicking the More icon, you'll also be able to set which Dashboard you'd like to be logged into as the default. This can be changed at any time.
If Multi-Factor Authentication (MFA) is set up for Login or Refunds, your MFA will apply to all Dashboard accounts associated with the same email address, or aliases, as opposed to separate MFA authentications for each Dashboard account.
If you add a new Dashboard account for an existing user and the email address is unique, synchronization is not possible. In this scenario you'll have a single user with two different Dashboard accounts and you'll need to log in separately to access them.
The Token.io sandbox is a software testing environment enabling isolated execution of API functionality for independent evaluation, monitoring or testing. The idea is to be able to test API features and code integration with or without your project in ideal conditions, emulating a production environment and its behaviors to test the functionality of the Token.io API with notional banks, account information and transaction values. Working in the sandbox, TPP developers can check and validate their code by testing it against a specific web service without creating unforeseen impacts within their normal operating environment and business processes.
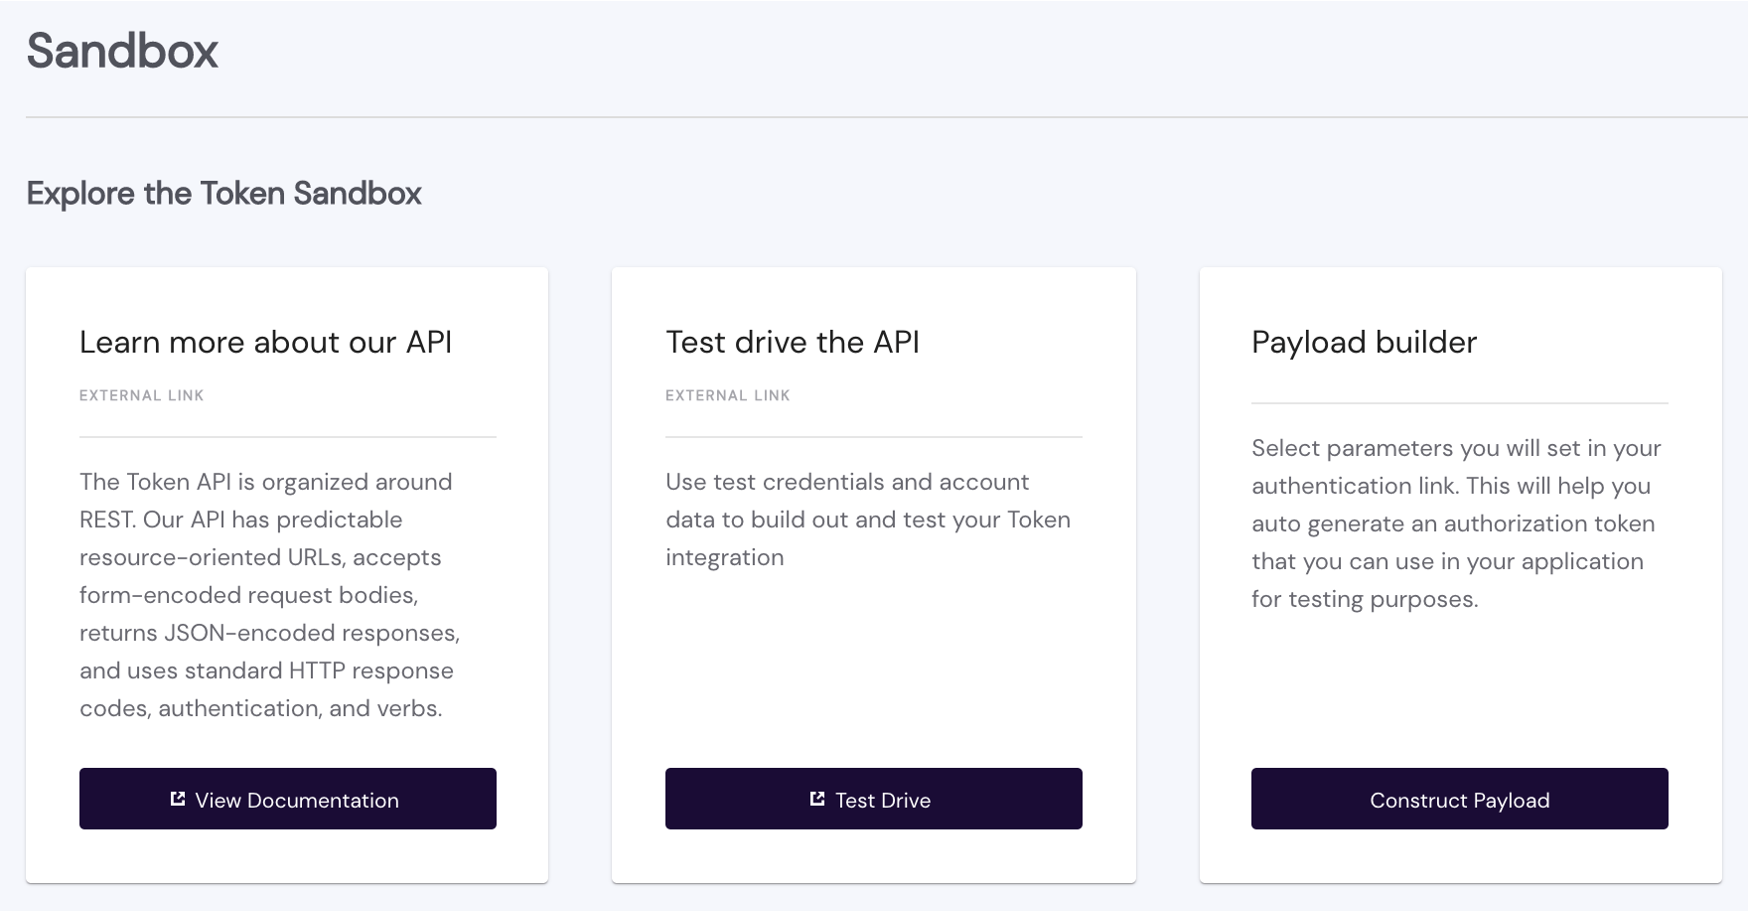
As pictured above, our sandbox is compromised of three major areas:
Documentation – the developer documentation you're currently reading. You can access this resource at any time from the sandbox. You can also access Documentation from its link in the navigation panel on the left side of the dashboard UI.
Testing – links to the API reference, this enables you to view the API parameters, so you can see how individual API features perform and the response details you'll receive for each request.
Payload Builder – generates an authorization token you can use for integration testing with your application. You can select either an API key or signing for authentication. You can also specify a callback URL for testing purposes to validate successful redirection and execution.
A word about testing with notional banks. Although Token.io's demo banks — also called notional banks — can be used to test your integration with the Token.io API in our sandbox environment, they should never be used for production testing.
To test your PIS integration in the sandbox, you should ideally use one bank for the source account,
e.g., requestPayload.transferBody.instructions.source
and the other for the transfer destination
e.g., requestPayload.transferBody.instructions.transferDestinations)
The account properties you assign will need to adhere to the object and field definitions for the endpoint being tested. Required objects and fields are labelled accordingly. All others are optional.
Presuming your test request is successful, the populated fields you receive in the response from the notional source bank will adhere to the applicable definition (click to enlarge):
Definition and format rules apply in the sandbox, as well as in production. You can find object-field definitions for each supported endpoint in the API definition. Simply click an item to expand its contents.
Taking a test drive of the Token.io API gives you the opportunity to see how the data provided in requests produces a payload in the corresponding response from the bank. You merely have to remain aware that, while you're in the sandbox, you're dealing with notional banks, which means that account information in response to access requests and transaction information in response to transfer requests are entirely hypothetical. In other words, the account(s), currencies, monetary amounts and execution dates/schedules are accurately modeled but have no effect in the real world.
This lets you run the gamut of potential requests in terms of size, scope and complexity — those within a range you anticipate as a general rule based on your current and planned business metrics, as well as requests which may prove to be rare or infrequent but which nevertheless need to be catered for, given your current and future clientele.
You can opt to test as a guest or you can apply your own API key to keep the results of different modeling/testing sessions consistent. In both cases, the tool automatically generates the necessary identifiers — account, member, user, and token — to authenticate your request, once you insert the required parameters into preformatted JSON and click Execute.
The Payload Builder helps you auto-generate an authorization token you can use in your integrated project for testing. It also lets you specify your callback URL so you can test where your user will be redirected after providing consent to the bank.

You first need to select a Request Type — Data (account information), Single Payment (immediate or future-dated). Each has a particular message structure to which you must to adhere to receive an affirmative response from the bank.
You then select the type of authentication key you will use in the request header: either a dashboard-generated API key or the Key ID of your public key. Both are managed in Authentication Keys under Settings. See the feature description in Authentication Keys.
Once you determine the key you will use, enter (copy-paste) it, in the case of an API key, or select a Key ID from the drop-down list, then provide the parameters necessary to generate a payload and your callback URL with a corresponding requestId.
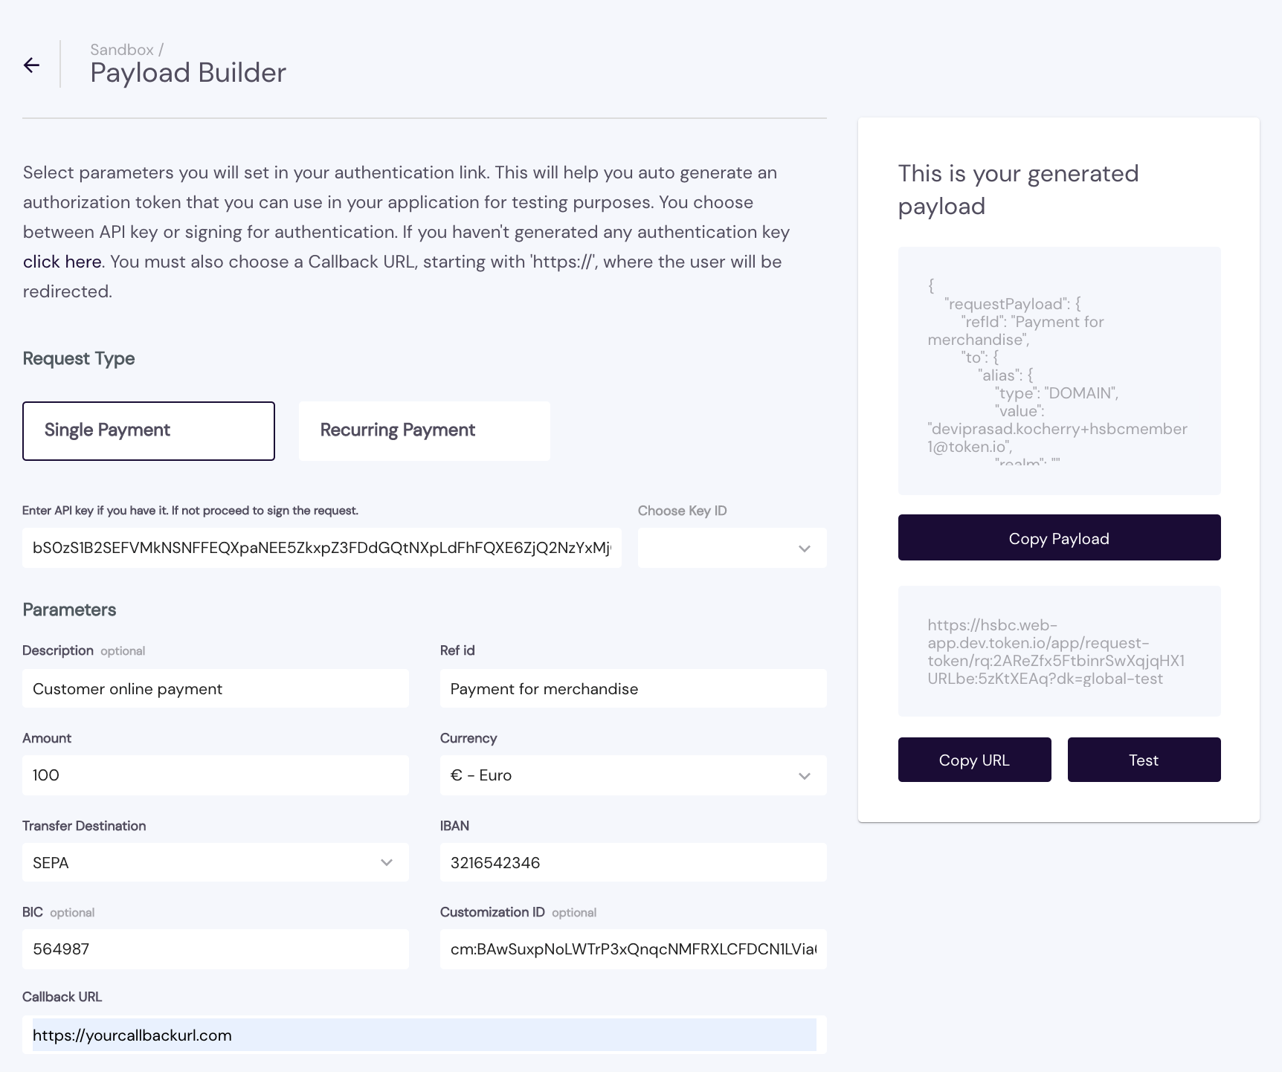
You can then Copy URL and/or Test the payload and redirect URL. Clicking Test, you will be redirected to the Hosted Pages.
DO NOT USE the Mock Banks (pictured below) for testing in the sandbox. These banks are strictly for internal platform testing purposes and will return a successful status even when the request is poorly formed or is otherwise invalid.
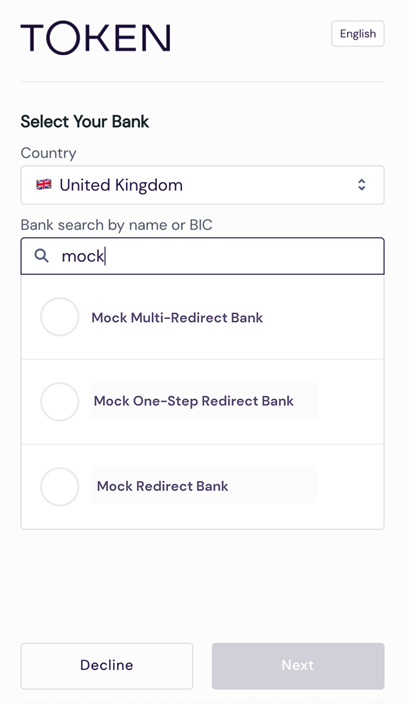
However, bank-adapter specific mock banks will produce accurate results and can be used for sandbox testing. These are prefaced with the name of the bank, when available.
See Construct the authorization header and API signing and authentication for additional guidance.
(for TPPs with Partner permissions only)
TPPs using Token.io's license with Partner permissions can support sub-TPPs in an "acting as" capacity and onboard them under the aegis of Token.io's license. See Licensing and integration models for more on the distinctions between sub-TPPs and TPPs with Partner permissions.
For these "resellers" Token.io provides an API for uploading and onboarding sub-TPPs. Sub-TPP registration can also accomplished manually using the dashboard's onboarding tools found in TPP Manager. Both cases support simplified sub-TPP onboarding with common API authentication credentials, eliminating the need for separate keys for each sub-TPP/merchant, as well as eliminating memberId generation for each individual sub-TPP.
TPPs with Partner permissions entering into an agency agreement with Token.io will have their sub-TPPs marked as 'approved' upon initial onboarding, although Token.io reserves the right to perform periodic KYC spot checks to ensure continued regulatory compliance. For partners choosing to forego an agency agreement, Token.io must perform its own due diligence on each of the partner's onboarded sub-TPPs before the sub-TPP is allowed to initiate payments.
A unique ID for each sub-TPP is automatically generated when the sub-TPP is created. This ID must be passed to Token.io in the actingAs.refId field of corresponding token requests. Token.io will then validate the actingAs.refId against the list of sub-TPPs onboarded by the partner. If actingAs.refId is not populated or the sub-TPP referenced in the field is not approved, an error message is returned.
To access the features of the Token.io Dashboard, you must log in with partner privileges, which authorise you to manage your sub-TPPs in one convenient interface:
create/add new sub-TPPs
edit a sub-TPP's details
deactivate/disable a sub-TPP
add, modify or delete a sub-TPP's beneficiary accounts
view and filter a sub-TPP's transaction history by status, date, and/or amount
add and deactivate sub-TPP users
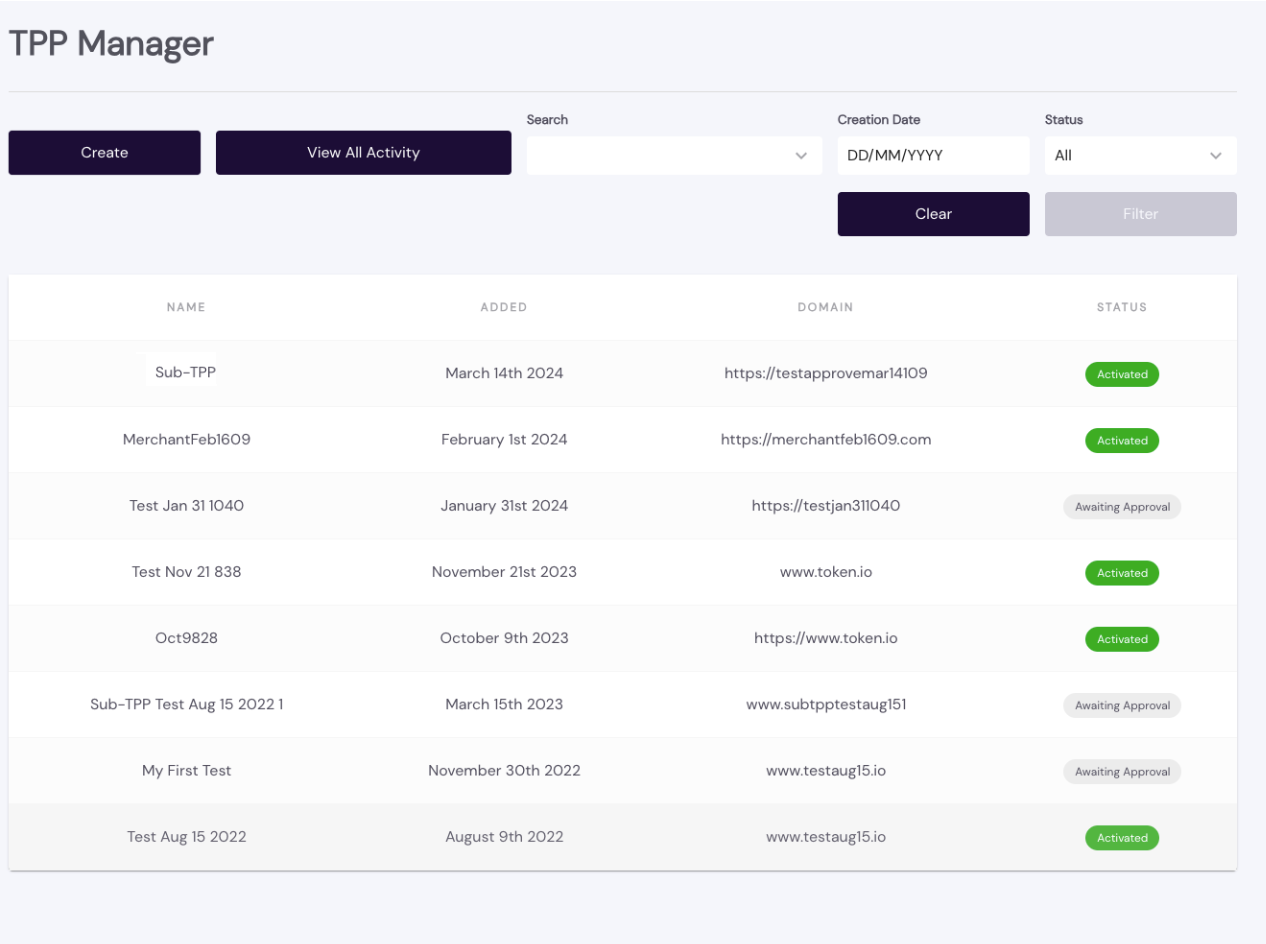
On signing in and clicking TPP Manager (or clicking TPP in the navigator on the left), you'll see a screen similar to the one below. If you haven't onboarded any sub-TPPs yet, the list won't be populated.

The STATUS column indicates the sub-TPP's current KYC due diligence standing, based on a verification conducted by the reseller (if an agency agreement is in place) or by Token.io (if no agency agreement exists). Only sub-TPPs with an Active status are permitted to initiate Open Banking requests.
When onboarding a new merchant, you can choose from three flows depending on the licence type and agreement:
TPP using their own license
TPP using Token.io's license with Reliance Agreement
TPP using Token.io's license without Reliance Agreement
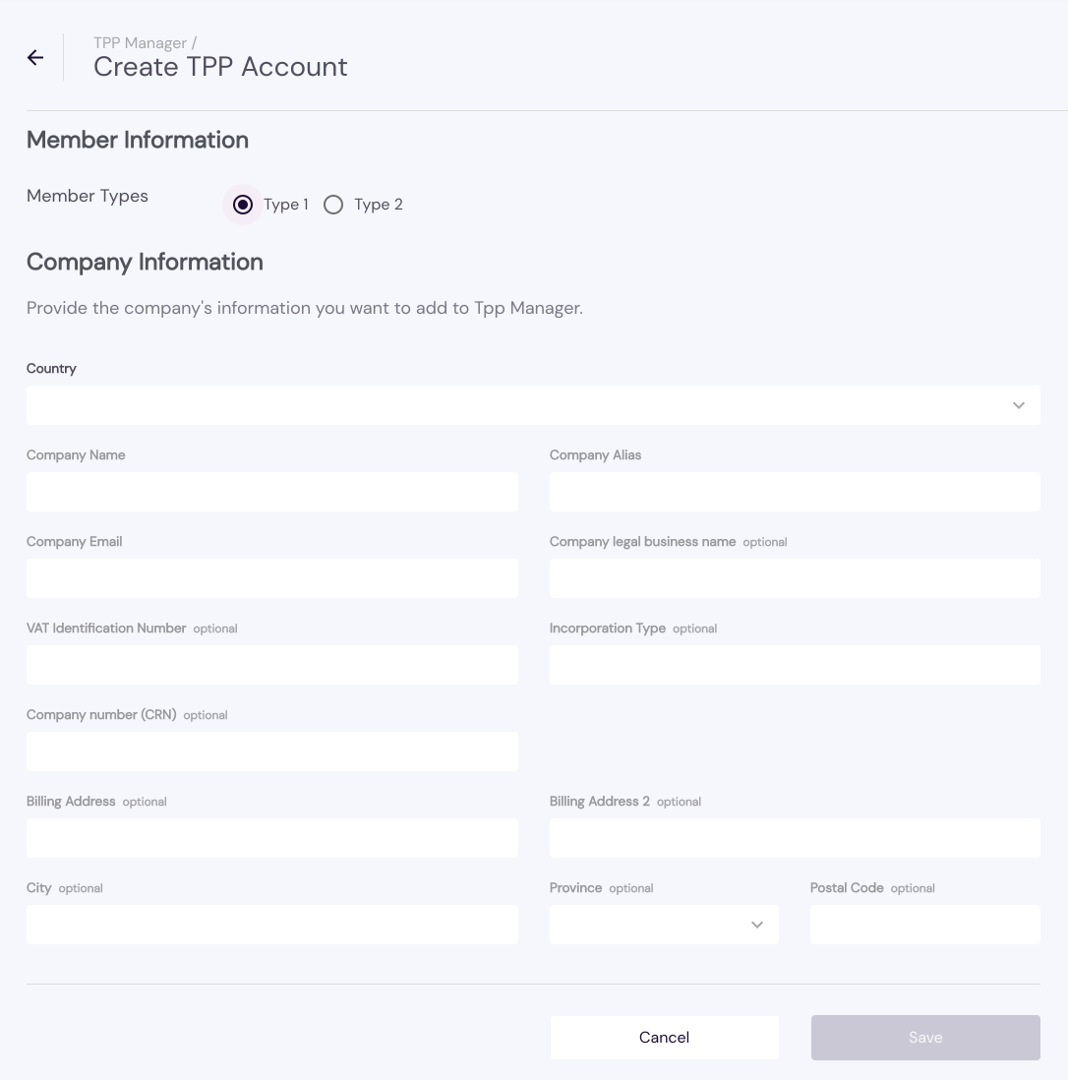
Click Create to add a new sub-TPP to TPP Manager and complete the form.
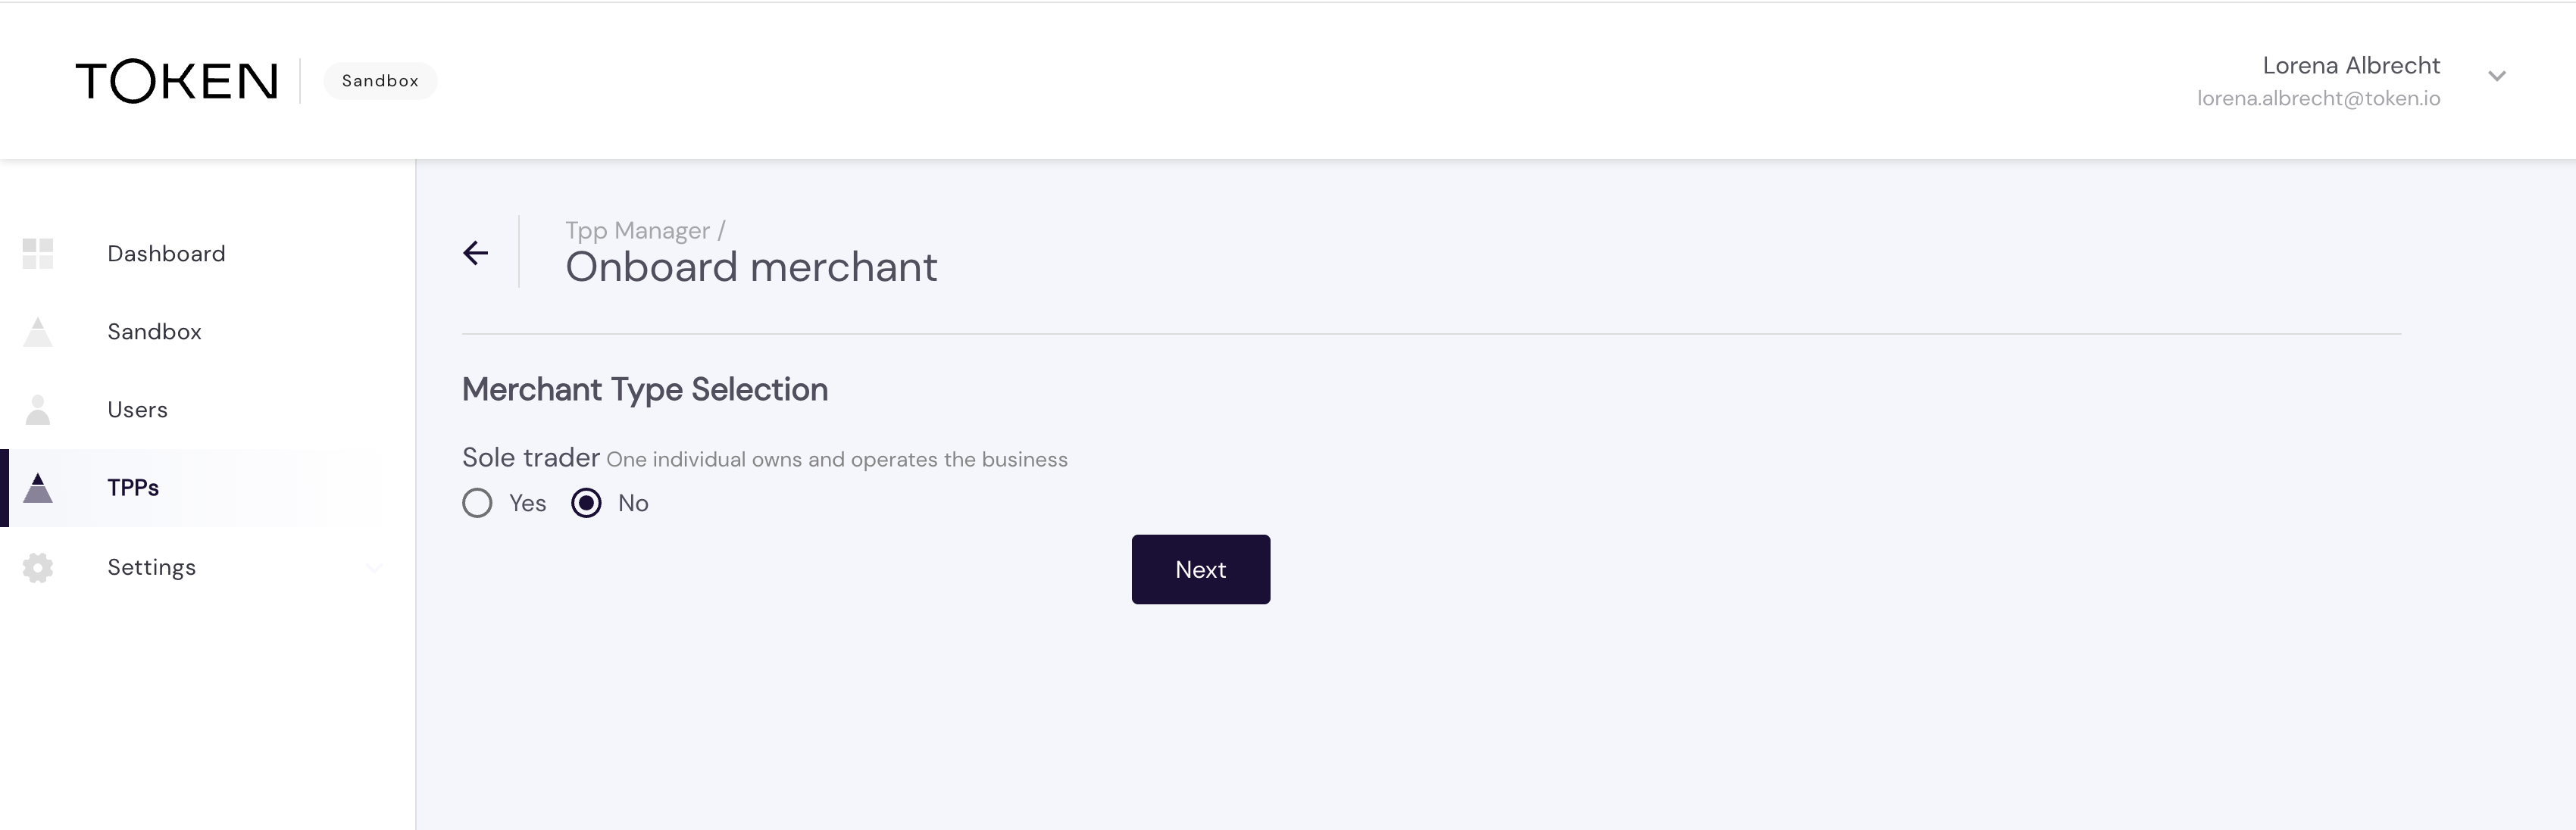
Select Yes or No for Merchant Type Sole trader
Enter Merfchant information
Enter Beneficiary account details
Select the MMC code
Review Summary and click Confirm
Click Create to add a new sub-TPP to TPP Manager and complete the form.
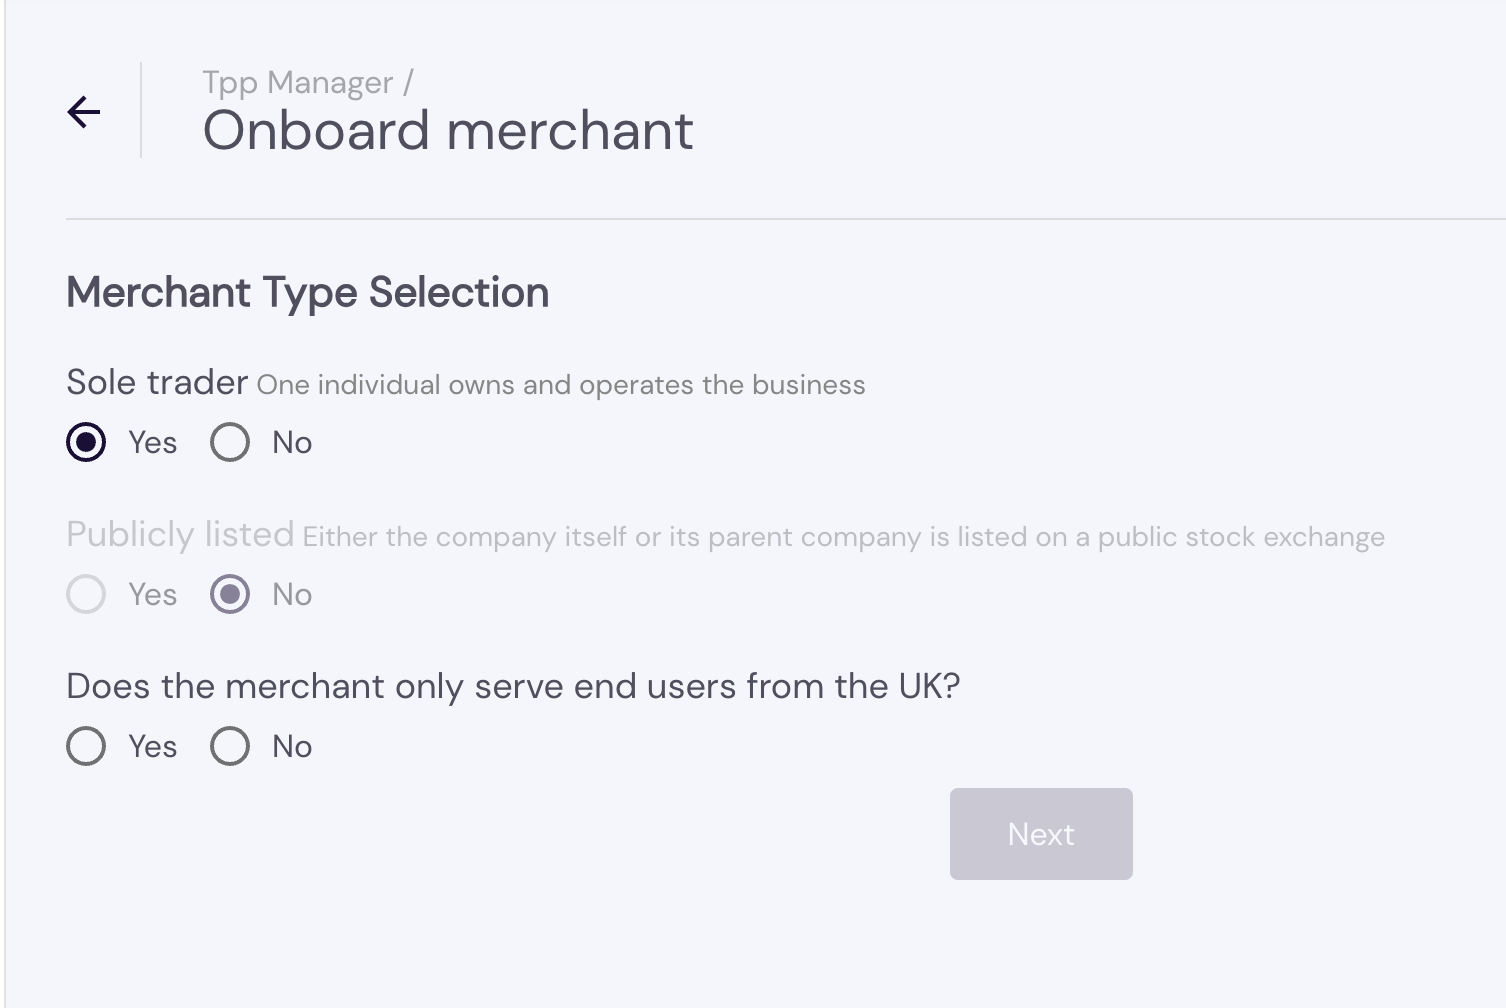
Select Yes for Merchant Type Sole trader. A Sole trader is one individual owning and operating the business. (When the merchant is a sole trader, the option for publicity listed will be greyed out)
Select Yes or No for 'Does the merchant only serve end users from the UK?'
Enter Merchant information
Enter Beneficiary account details. Choose between 'Enter bank account' or 'Use settlement account'
Select an MCC code. Follow-up questions may appear depending on your choice
Enter Sole trader information
Review Summary and click Confirm
Click Create to add a new sub-TPP to TPP Manager and complete the form.
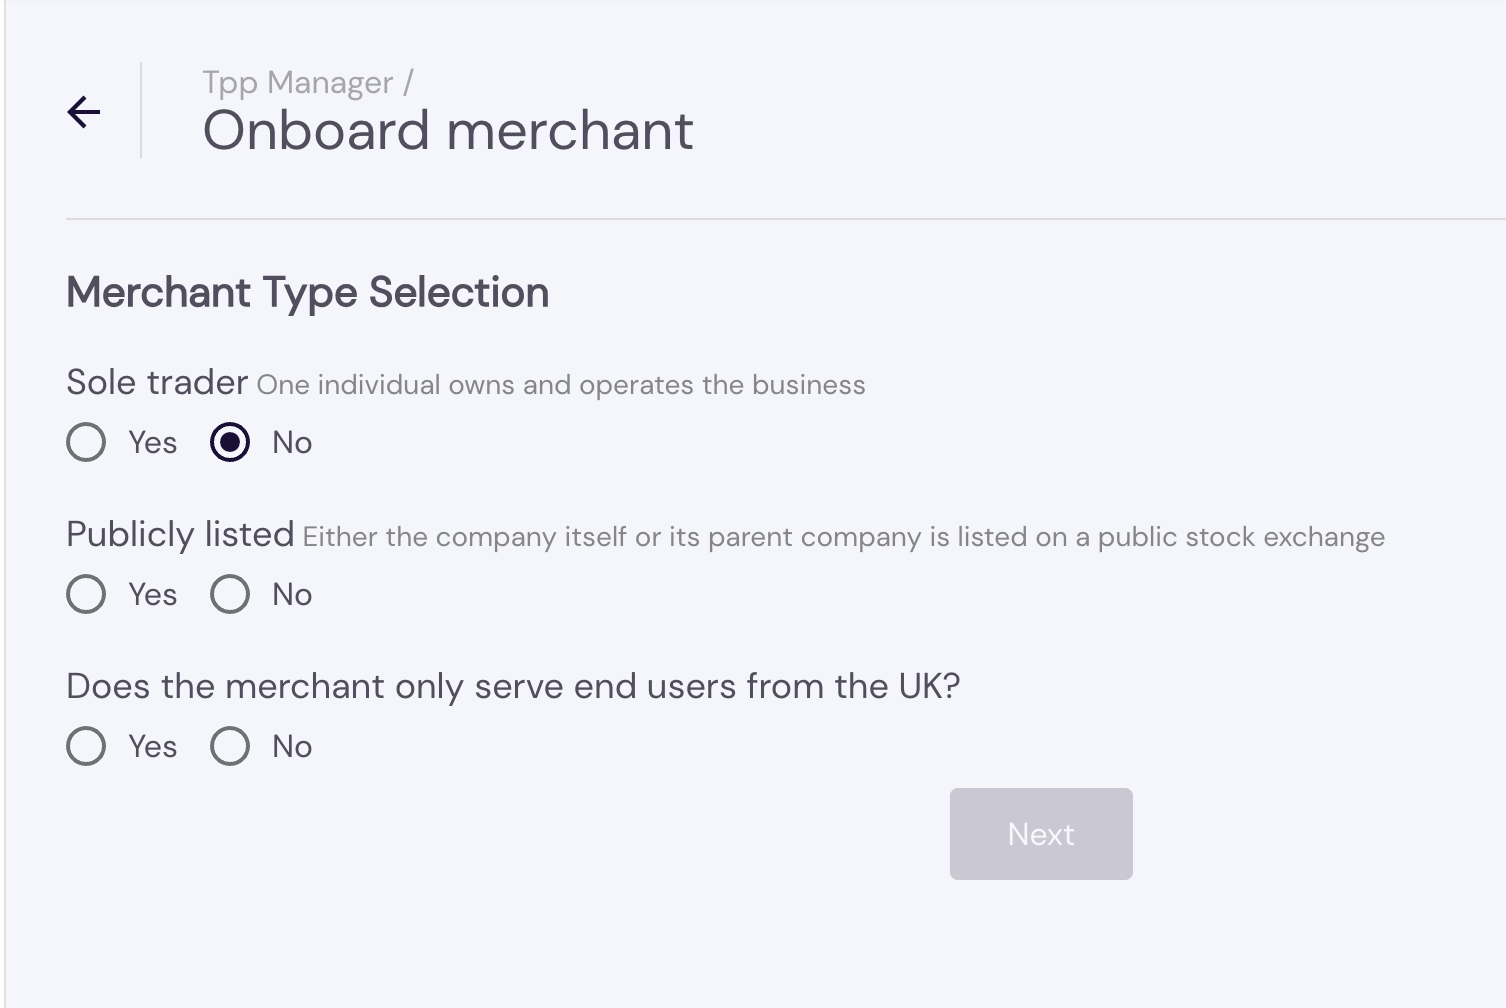
Select No Merchant Type Sole trader. A Sole trader is one individual owning and operating the business
Select Yes or No for Publicly listed. A company is publicly listed if either the company itself or its parent company is listed on a public stock exchange.
Select Yes or No for 'Does the merchant only serve end users from the UK?'
Enter Merchant information
Enter Beneficiary account details. Choose between 'Enter bank account' or 'Use settlement account'
Select an MCC code. Follow-up questions may appear depending on your choice
Enter Signatory information
Only if 'Publicly listed' = No was chosen the 'Ultimate beneficial owners and directors information' will show up. Enter the details
Review Summary and click Confirm
Click Create to add a new sub-TPP to TPP Manager and complete the form.
Select Yes for Merchant Type Sole trader. A Sole trader is one individual owning and operating the business. (When the merchant is a sole trader, the option for publicity listed will be greyed out)
Select Yes or No for 'Does the merchant only serve end users from the UK?'
Enter Merchant information
Enter Beneficiary account details. Choose between 'Enter bank account' or 'Use settlement account'
Select an MCC code. Follow-up questions may appear depending on your choice
Enter Sole trader information
Review Summary and click Confirm
Click Create to add a new sub-TPP to TPP Manager and complete the form.
Select No Merchant Type Sole trader. A Sole trader is one individual owning and operating the business
Select Yes or No for Publicly listed. A company is publicly listed if either the company itself or its parent company is listed on a public stock exchange.
Select Yes or No for 'Does the merchant only serve end users from the UK?'
Enter Merchant information
Enter Beneficiary account details. Choose between 'Enter bank account' or 'Use settlement account'
Select an MCC code. Follow-up questions may appear depending on your choice
Enter Signatory information
Only if 'Publicly listed' = No was chosen the 'Ultimate beneficial owners and directors information' will show up. Enter the details
Review Summary and click Confirm
After a merchant has been on-boarded, TPP users are prompted to create an optional sub-TPP user account. This account should be for someone from the sub-TPP's company who needs access to the Dashboard.
A user account can also be created for a sub-TPP at a later stage.
Once a merchant is onboarded only the Compliance team can approve, decline and edit merchants.
Sub-TPPs are able to create Admin and Payment Ops users, who can perform the following functions:
view transactions made with their entity
view and manage settlement accounts and settlement rules (if enabled)
view and perform refunds from settlement accounts (if enabled)
update UI configuration.
To upload a document requested by Compliance, go to the TPP Manager Dashboard and click on the relevant TPP.
Click Upload now to upload the document immediately, or Later to do it at another time
Upload the required document(s) and click Submit
Once uploaded, the status next to the merchant’s name updates to Awaiting approval.
The TPP Manager displays a list of the sub-TPPs you have onboarded, which can be filtered.
Click a sub-TPP to view its details.
IMAGE - sub-TPP details
By opening the sub-TPP's Details you can view and/or export a filtered list of Transactions initiated by the sub-TPP and manage the sub-TPP's configurations.
After selecting a sub-TPP and opening its Details, click Update Configurations to control the sub-TPP's Hosted Pages settings. The available configuration settings are accessed under the respective tabs.
** Update sub-TPP config**
On this page you can control with which banks the selected sub-TPP is permitted to initiate Open Banking requests. Only the banks you configure for this sub-TPP will be available for the user selection in the Hosted Pages.
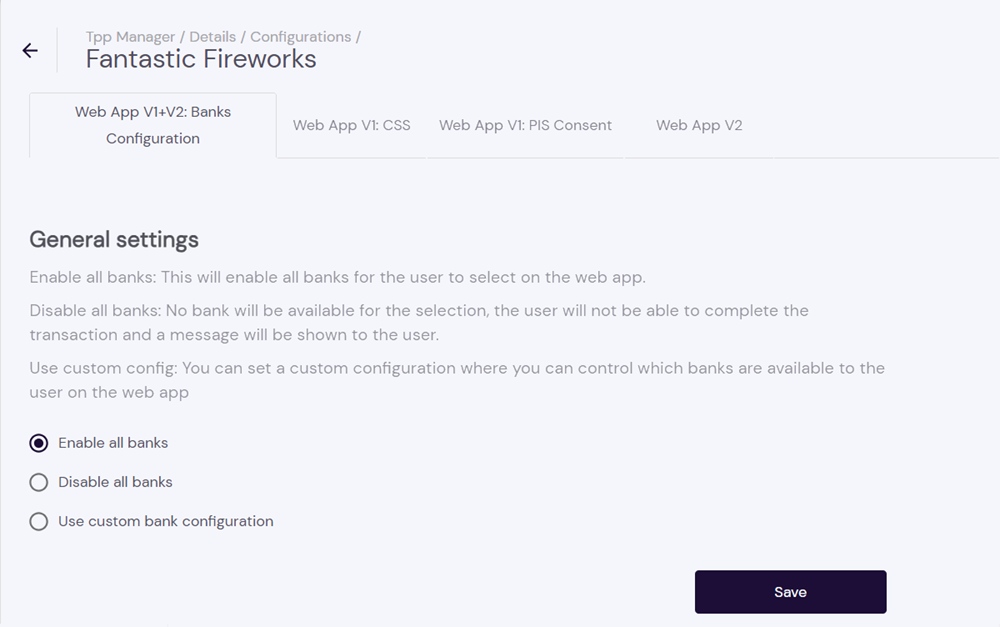
Select Use custom bank configuration to view options for configuring the sub-TPP.
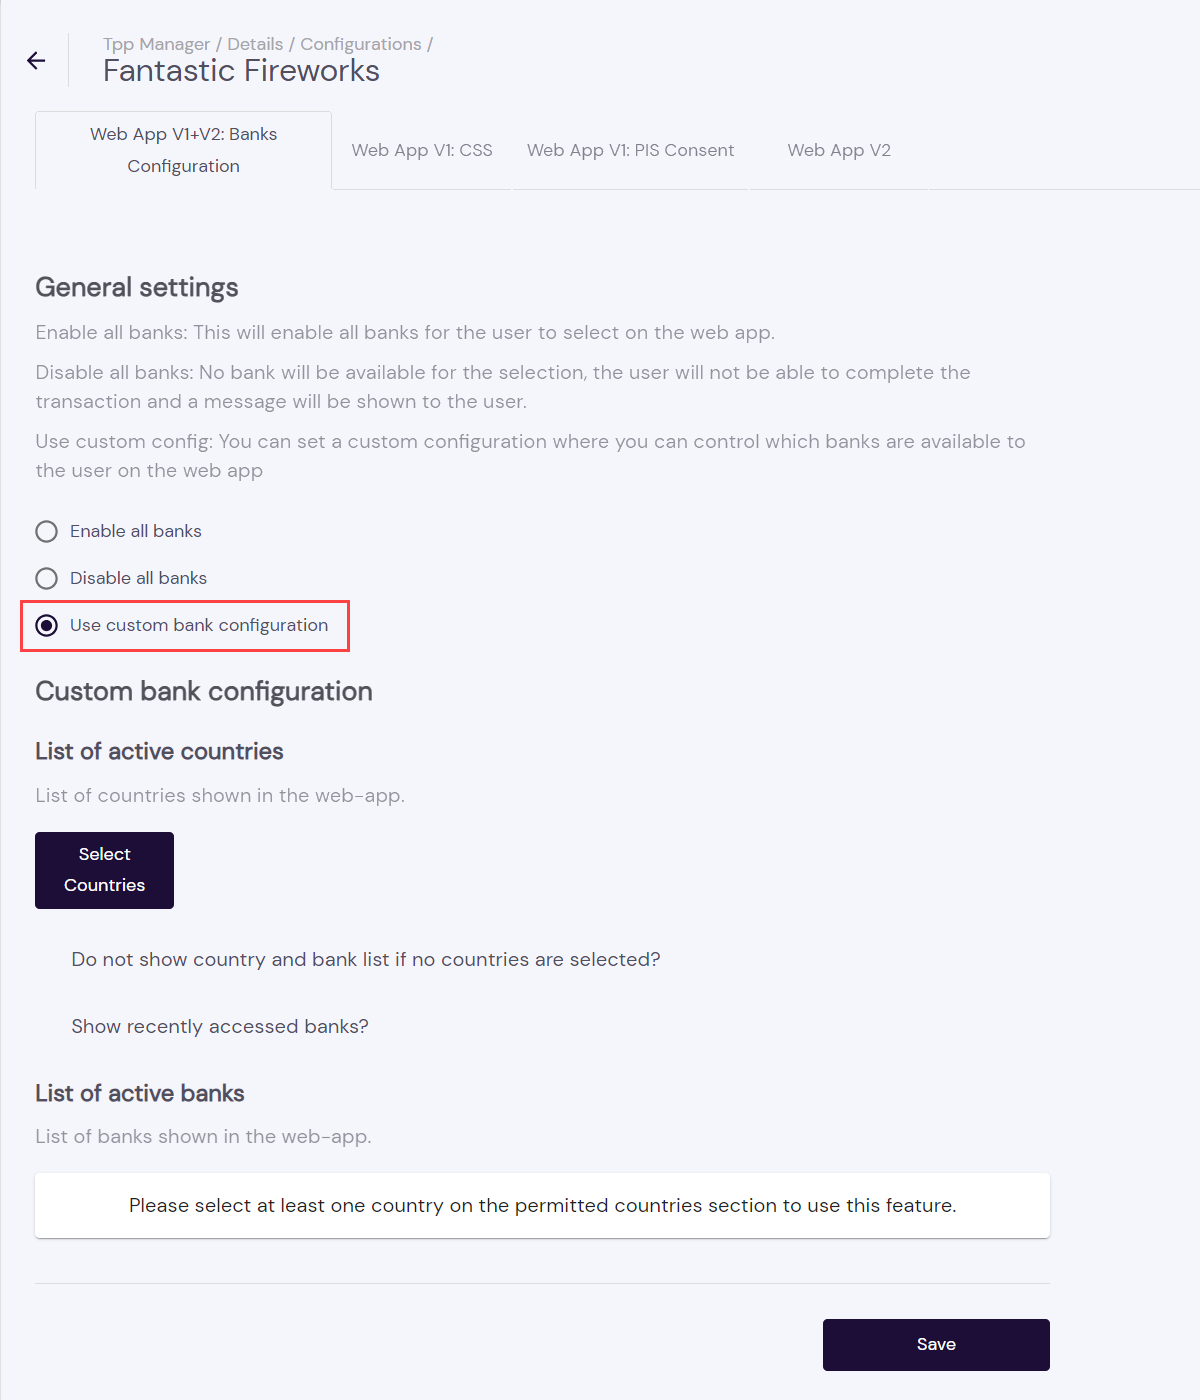
Click Select Countries to control the countries this sub-TPP is permitted to operate in for the purposes of Open Banking.
Once the country has been selected, you have the options to filter, add and modify the selected banks within the selected countries.
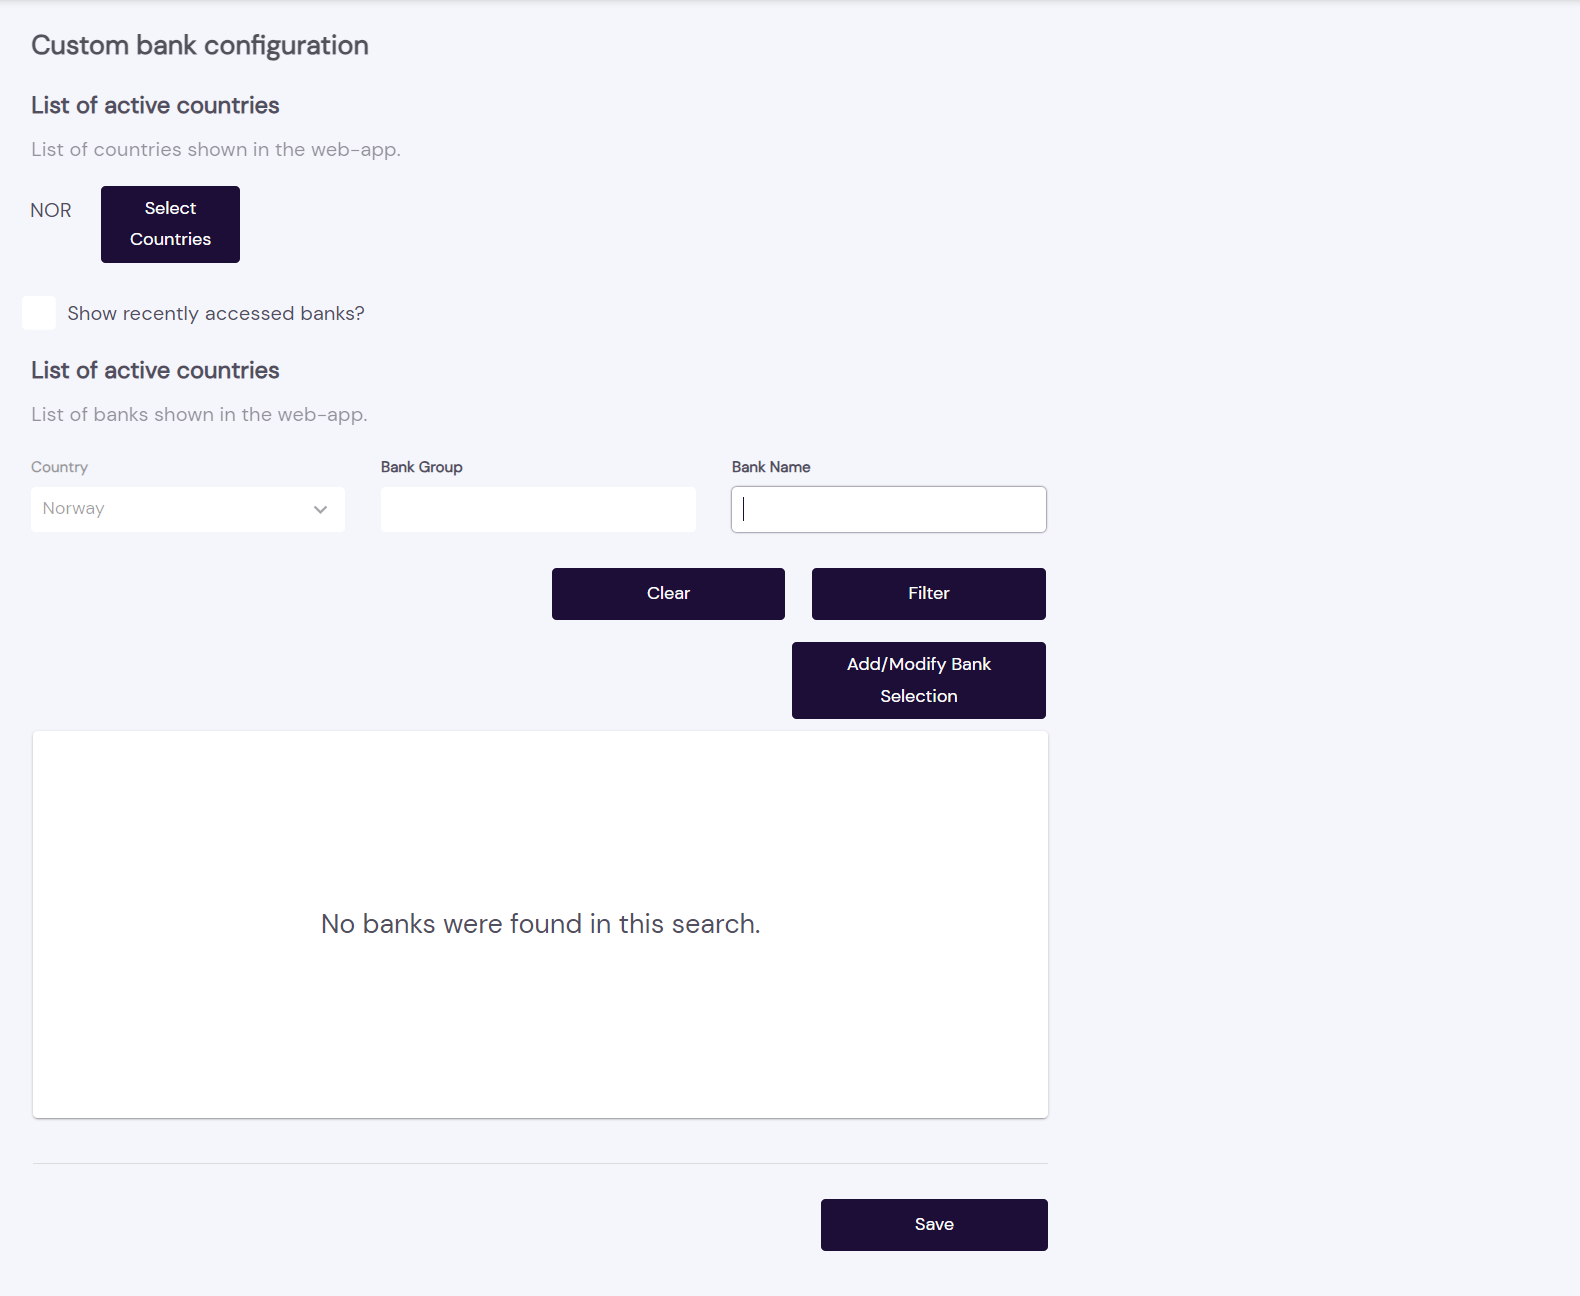
Click Save to keep your changes.
After selecting a sub-TPP and opening its Details, scroll down to the Transactions and click View list to view the transactions conducted by the sub-TPP.
The list of transactions can be filtered by:
Status
Start and End Dates
Amount
Ref ID
Description
Timezone
Refund status
Select your desired filtering criteria to further refine the list displayed, then click Filter.
Click an entry in the list of results to view its Transaction Details — Beneficiary Account, Amount, Currency, Payment Method, Reference Identifier, Description, Status and Bank Name.
Click Export to create a .csv file of the transactions.
Click Clear to reset the filtering criteria.
In ** TPP Manager**, click View All Activity, then select:
the AIS tab to view the respective account information metrics (if you support the AIS service) for Tokens Created and Tokens Expiring
the PIS – Activity Analysis tab to see transaction activity for all sub-TPPs — Total Volume, Total Requests, Success Rates, Successful Requests, Error Requests, and Total requests by status, along with an itemized Transaction List showing the respective source_bank and transaction_id, along with the ref_id that can be used to identify the corresponding sub-TPP

The refId in the first column reflects the sub-TPP-created requestPayload.refId, rather than the actingAs.refId generated by Token.io used to verify the permissions of an active sub-TPP before a request is allowed to go forward.
You can also filter the list using controls for the service you're monitoring. The available Controls for PIS comprise:
status
currency
bank
startdate
enddate
Click the down-arrow or an individual control in the Controls bar to set your filtering criteria, then click the drop-down box for a control to select its value.

The transaction history for your sub-TPPs can be filtered by selected Start Date and End Date under the PIS – View Activity History Daily tab.
To increase the viewing area of the Transaction List, hover over it, then click the Maximize icon,
To restore the list to normal size, click the Minimize icon,
To export the list to a .csv file, click the Menu options icon,
Click the Incomplete Token Requests tab to view the list of requests submitted that are either still pending or have been abandoned by the sub-TPP. You may need to scroll to the right to see this tab.
In TPP Manager click the Search drop-down, then either:
click one of the sub-TPPs listed, or
enter a search string to select the closest match.
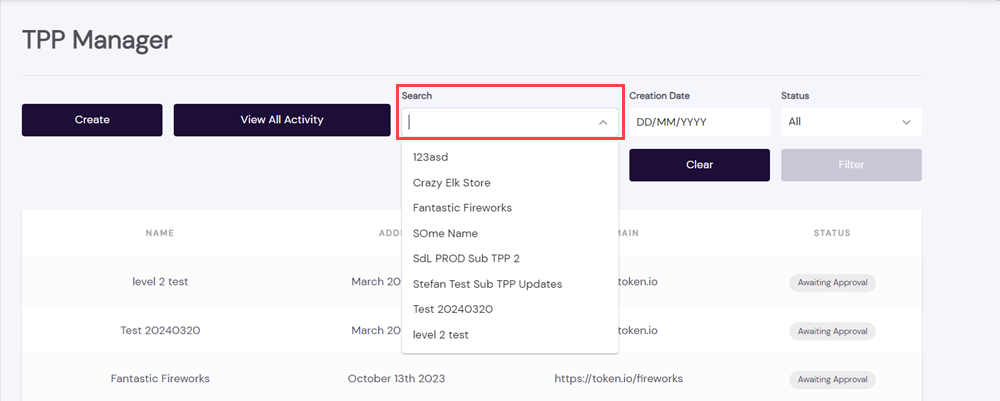
Once you've specified your filtering criteria, click Filter to display the results.
Click Clear to reset the filtering criteria.
In the TPP Manager, click in Creation Date and choose the required date from the calendar.
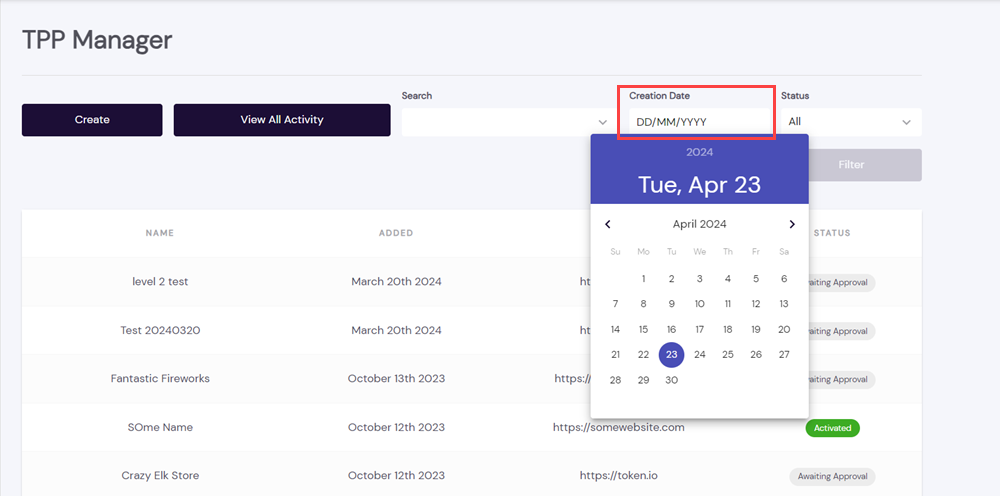
Use the left and right arrows surrounding the month to go back a month or advance the next month.
Once you've specified your filtering criteria, click Filter to display the results.
Click Clear to reset the filtering criteria.
In the TPP Manager, click the Status drop-down and select a sub-TPP status:
All – No status filter; include all sub-TPPs
Activated – sub-TPP has passed KYC due diligence check
Awaiting Approval – KYC due diligence check is pending/still in progress
Invalid Status – sub-TPP status is currently unavailable or unknown
Rejected – sub-TPP has failed KYC due diligence check
Deactivated – sub-TPPs has been deactivated; Open Banking privileges are disabled

Once you've specified your filtering criteria, click Filter to display the results.
Click Clear to reset the filtering criteria.
Click Activity in the navigation panel to get a filtered or unfiltered overview of request metrics for a specified period of time.
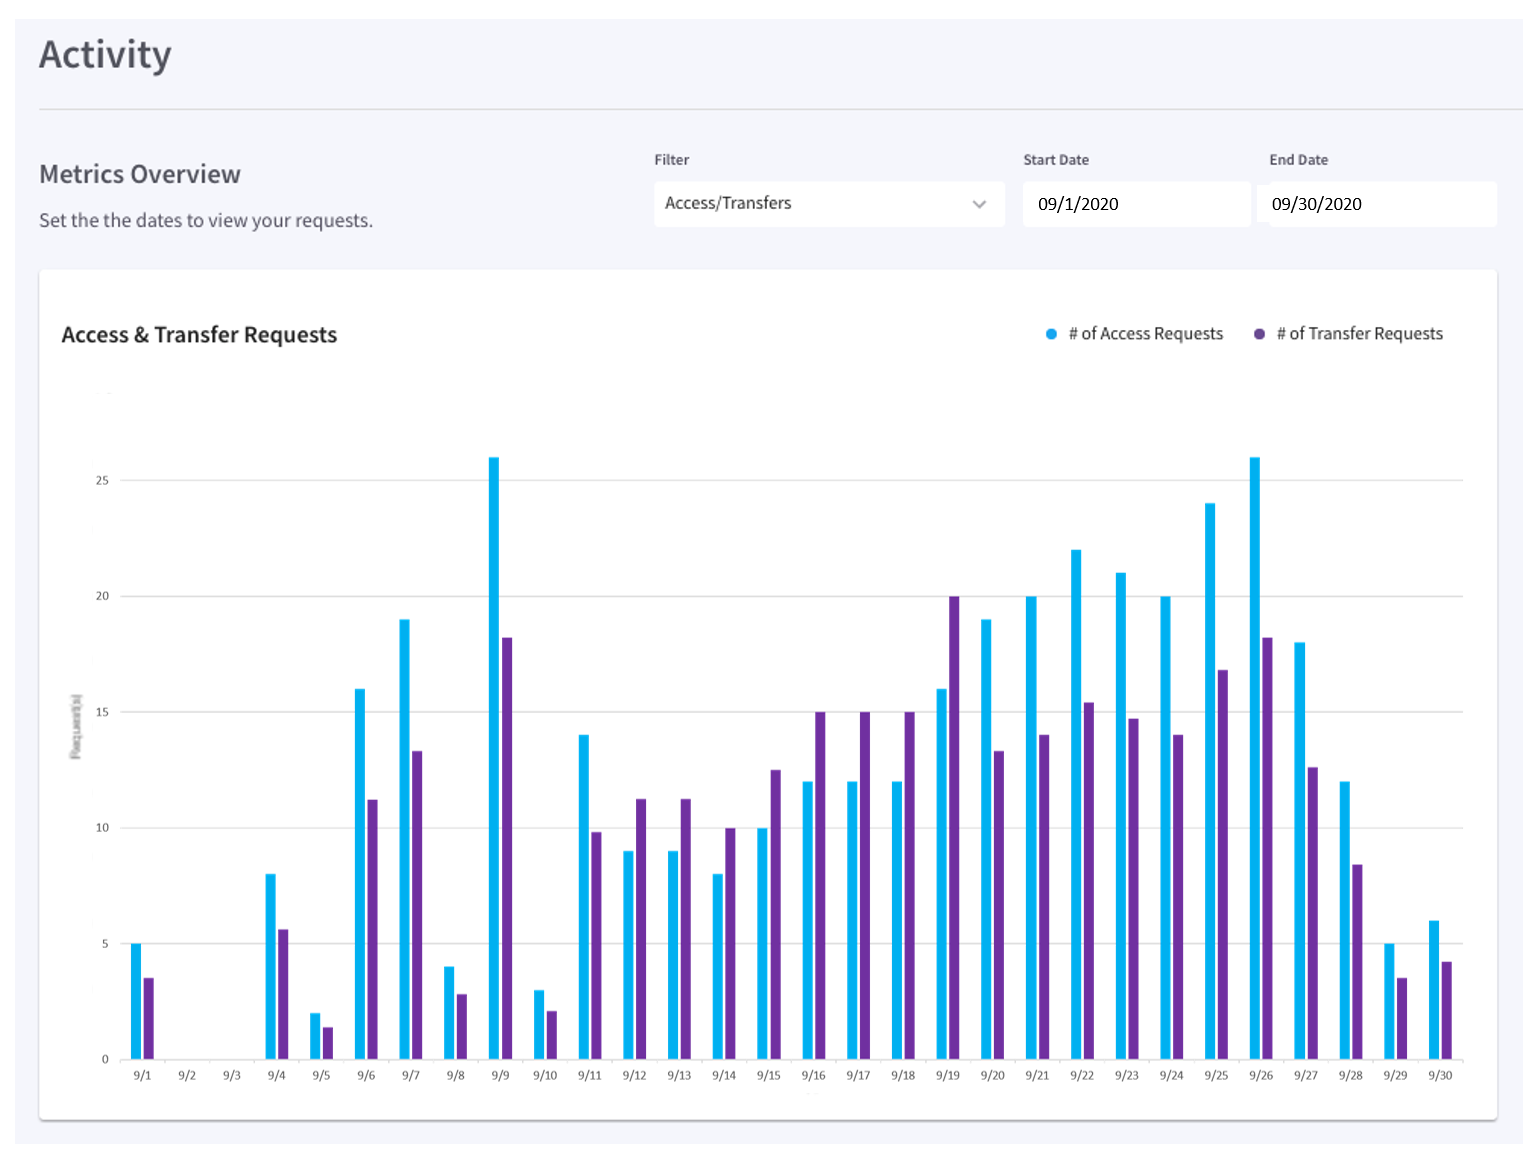
As pictured above (click to enlarge), you can Filter the number of Access requests, Transfer requests, or both, between a specified Start Date and End Date. Plotted data is displayed in the panel directly beneath chart.
Clicking on Users in the dashboard's navigation panel lets you Add (invite), Modify (Name and Title only), and/or Deactivate (remove) members of your development and administration team.
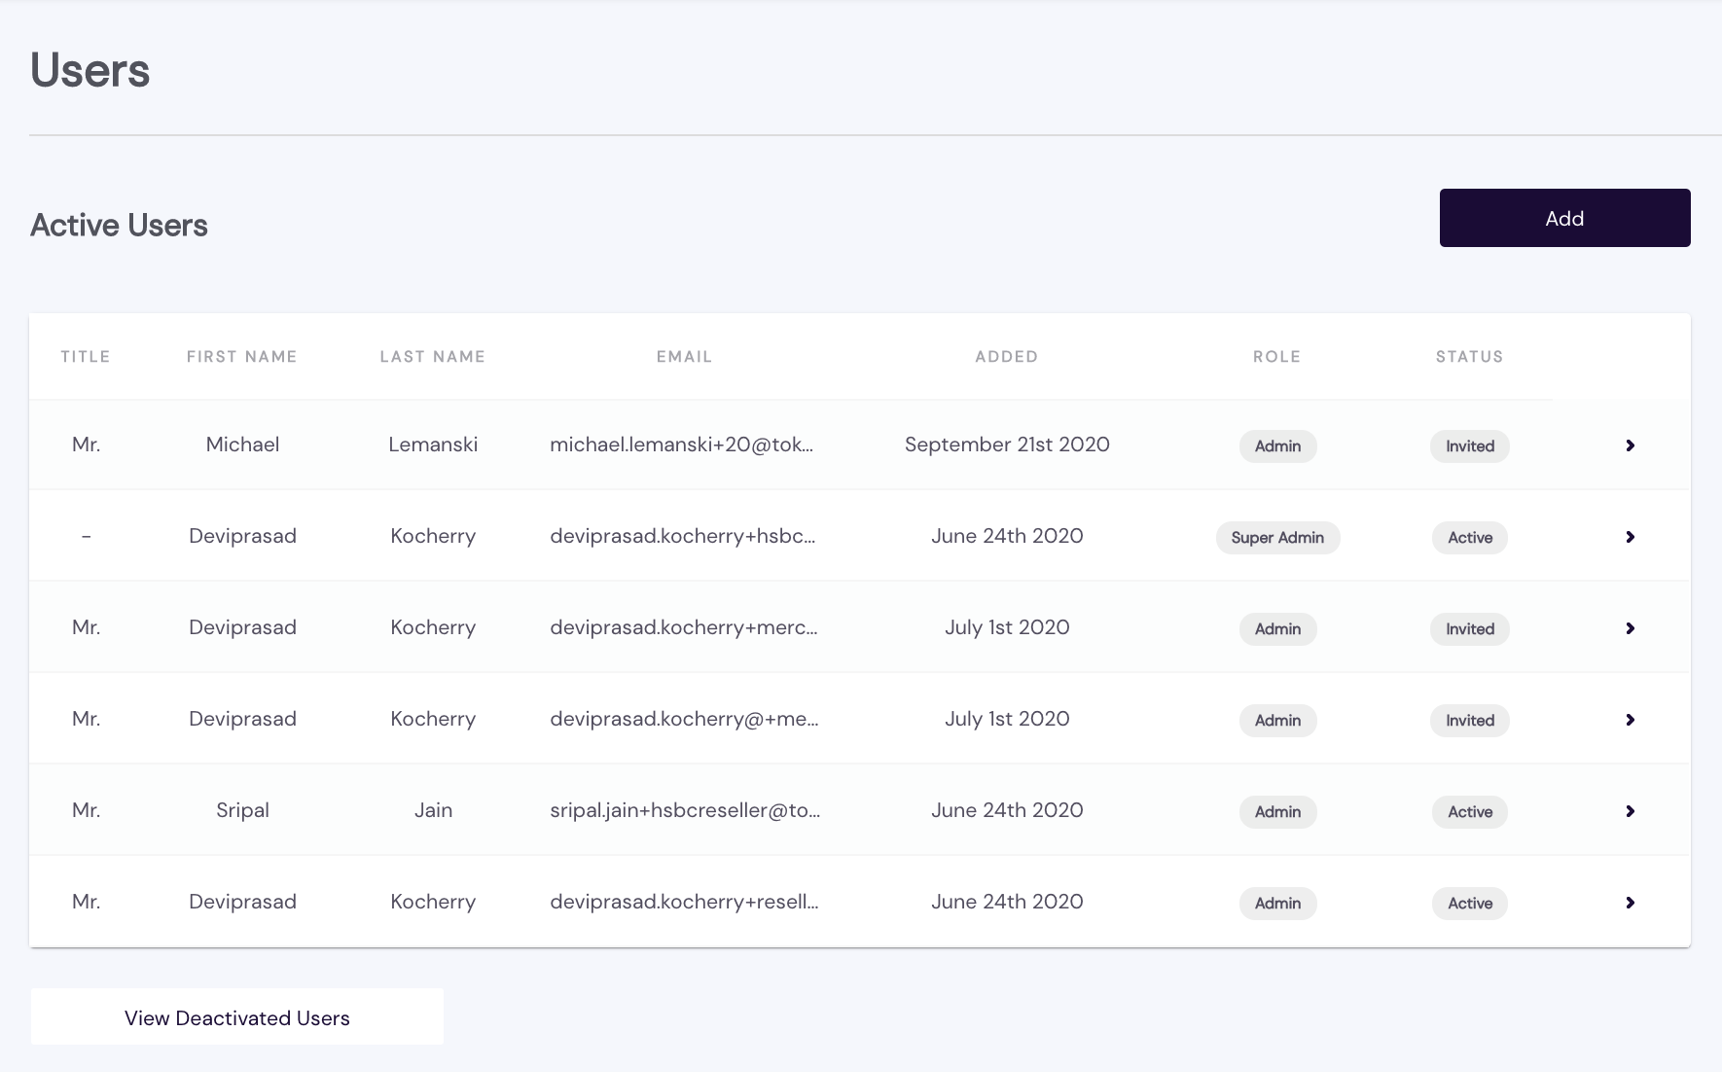
Users are assigned one of the following roles — Admin, Developer, Payment Ops, or Payops Reporting:
The Admin role is granted full-scope permissions for the team of users, with the exception of viewing User audit logs and initiating Refunds.
The Developer role is granted access to the dashboard but cannot change your organisation's dashboard Settings or manage your other member users.
Permission to initiate a refund and manage certificates for bank connections is granted exclusively to the Payment Ops role.
The Payops Reporting role can access your sub-TPP activity history and refund history for reporting purposes.
User roles and permissions are summarised in the following table:
| User Role | View User Audit Logs | View Dashboard | Access Sandbox | Manage Auth Keys | Manage Certs | Manage Users | Manage TPPs | Change Dashboard Settings | Initiate Refunds | View/Export Transaction Data | Bank Connxs | Refunds |
|---|---|---|---|---|---|---|---|---|---|---|---|---|
| Admin | — |  | | | — | | | | | — | | |
| Developer | — | | | — | — | — | — | — | — | — | — | — |
| Payment Ops | — | — | — | — | | — | — | — | — | | | |
| Payops Reporting | — | — | — | — | — | — | — | — | — | — | — | |
If you are an Admin user, click any Active User to modify or delete the listing.
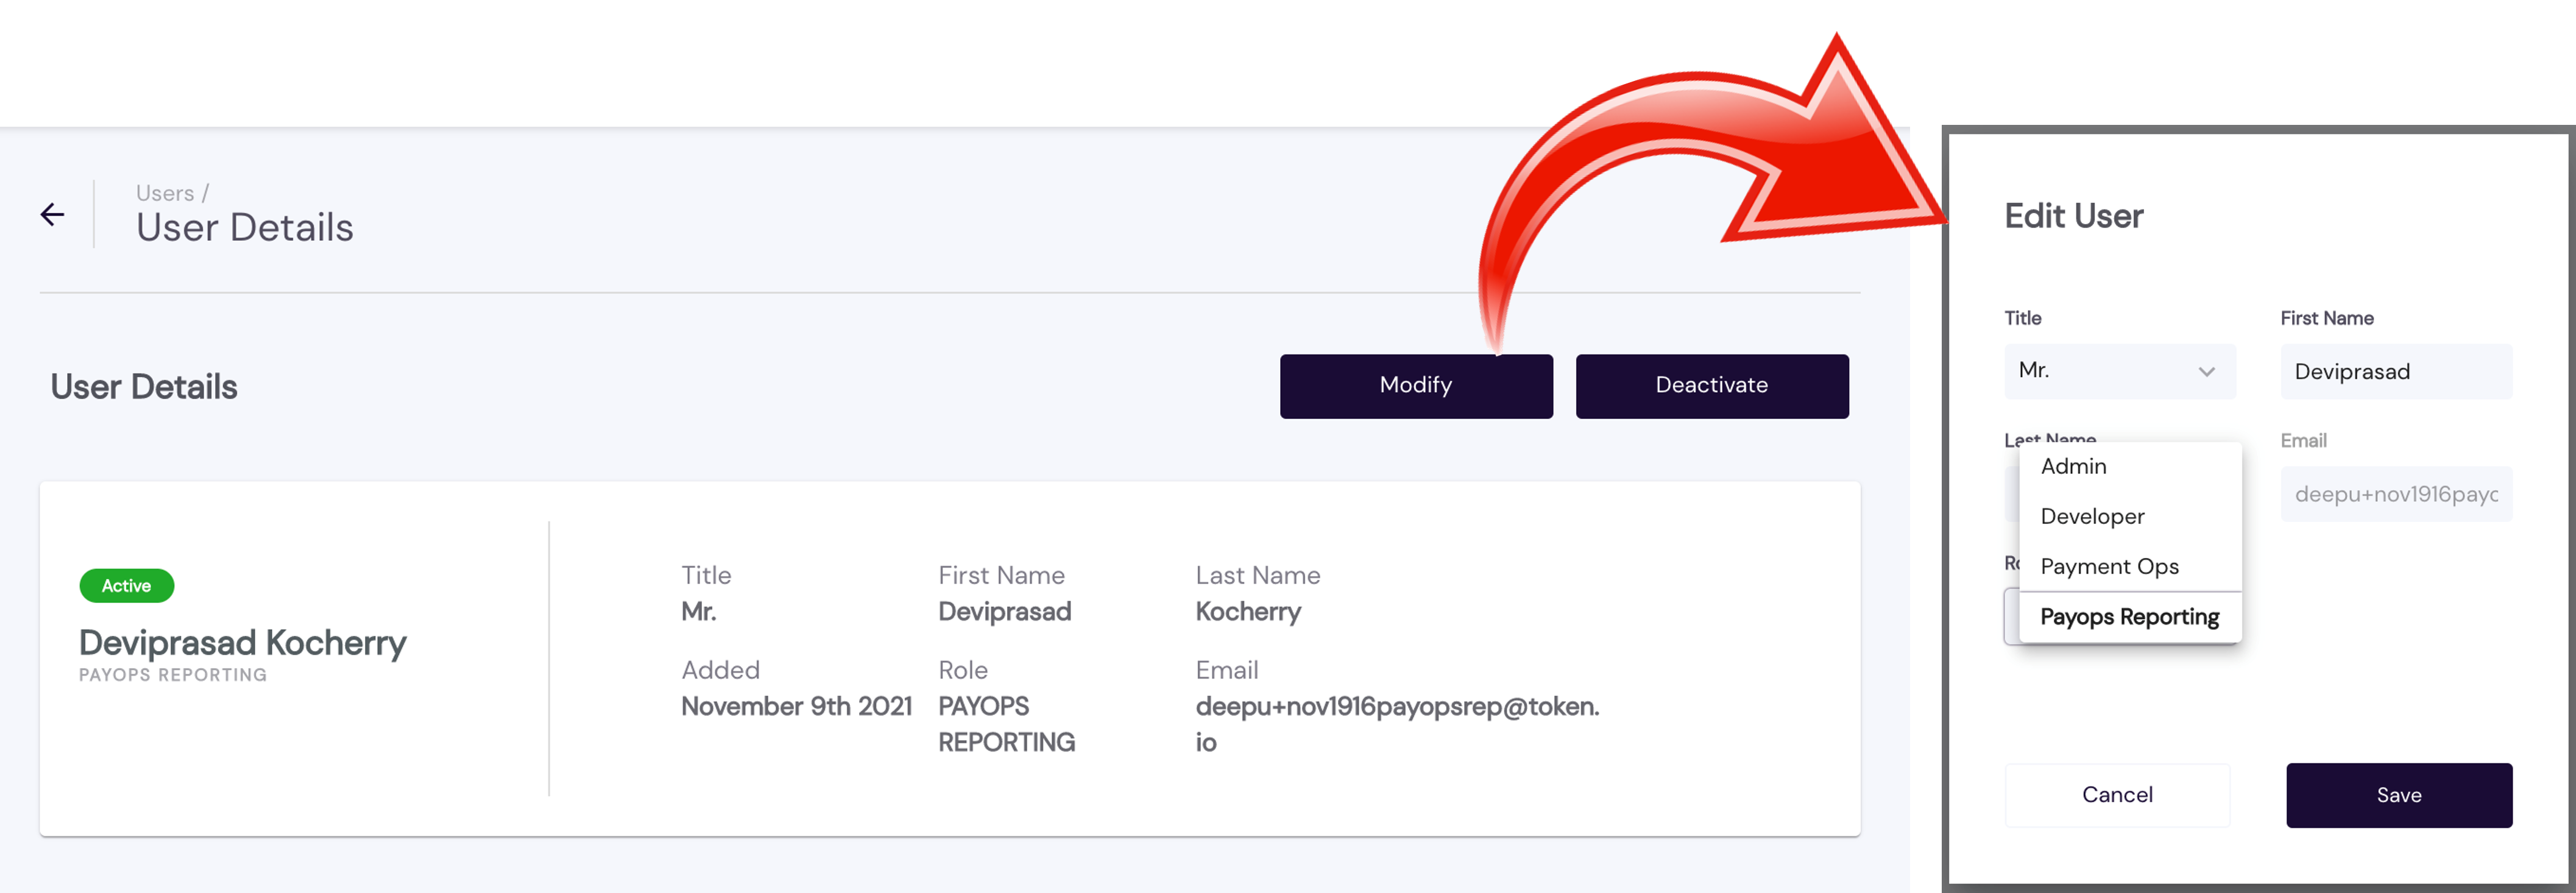
As an Admin, you can edit the Name, Title, and Role, but the user's Email cannot be changed. However, you can deactivate a user and then add the same user with a different Email, when such a change is necessary.
Deactivate a user by selecting the name from the Active Users list and then clicking Deactivate. View the list of deactivated users by clicking View Deactivated Users at the bottom of the list of Active Users.
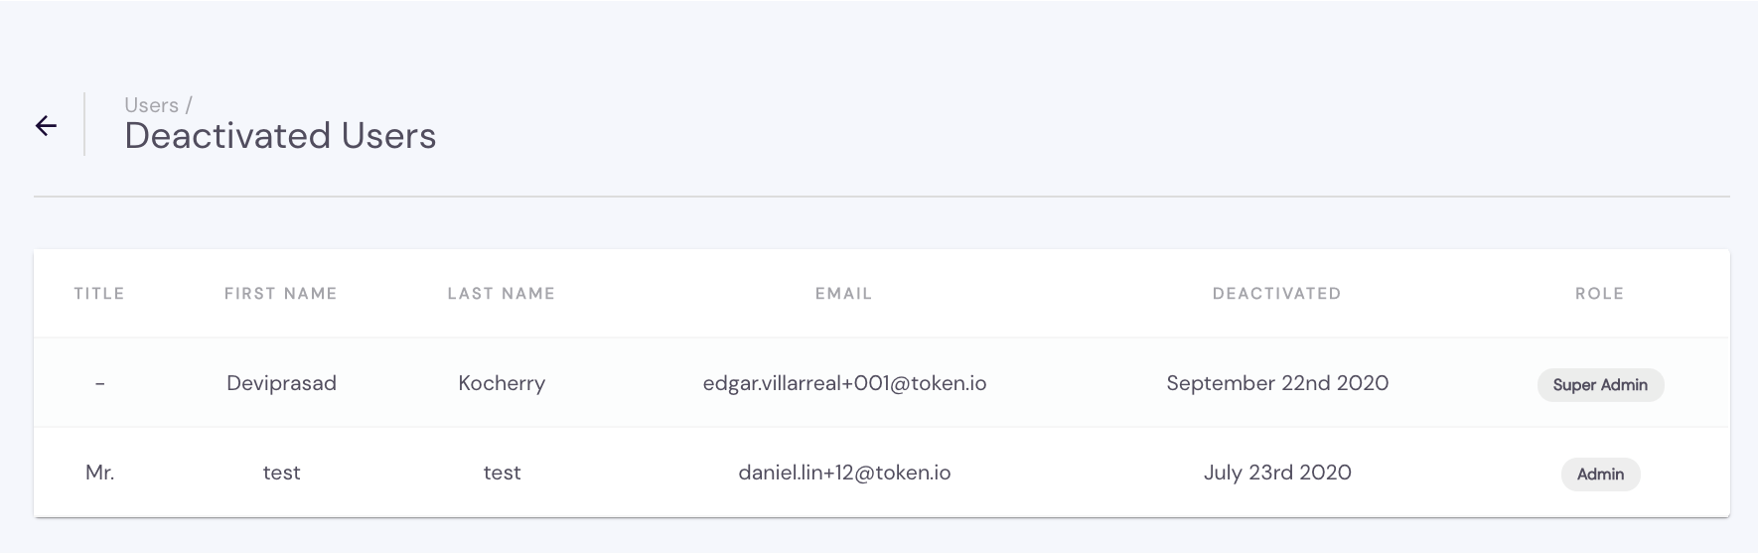
Deactivated users must be manually added back to regain access to dashboard.
Token.io's payments reconciliation rules allow TPPs to determine whether payments match certain criteria. These built-in rules help detect and guard against fraud risk, enabling you to take appropriate action.
You can search specific fields in the dashboard and create custom rules based on the unique logic specific to your business. For example, you can:
Review all payments greater than 1,000 USD.
Allow all payments from specific IP addresses.
Block payments made from a location outside your country.
Prevent payments that exceed a daily transaction count.
When integrating to Token.io, you should consider what data points you want to use to match payment initiation requests to orders and/or bank data.
Rules can be created based on attributes specified in the payment initiation request:
Amount
Currency
Payment scheme
Payer bank
When a payment request is initiated, the Token.io platform will check whether any of these rules have been violated. If they have, Token.io will reject the payment request.
Click on Settings in the dashboard's navigator to expand the settings menu and review/adjust your primary dashboard controls. These include:
Certain settings are only available once you transition to production. Click the links above for a brief overview of the respective setting.
Maintain and update User Details (user name), Company Info (location, dba, website, email, official/legal business name, VAT number, incorporation type, CRN, billing address), Update Password (change your current password).
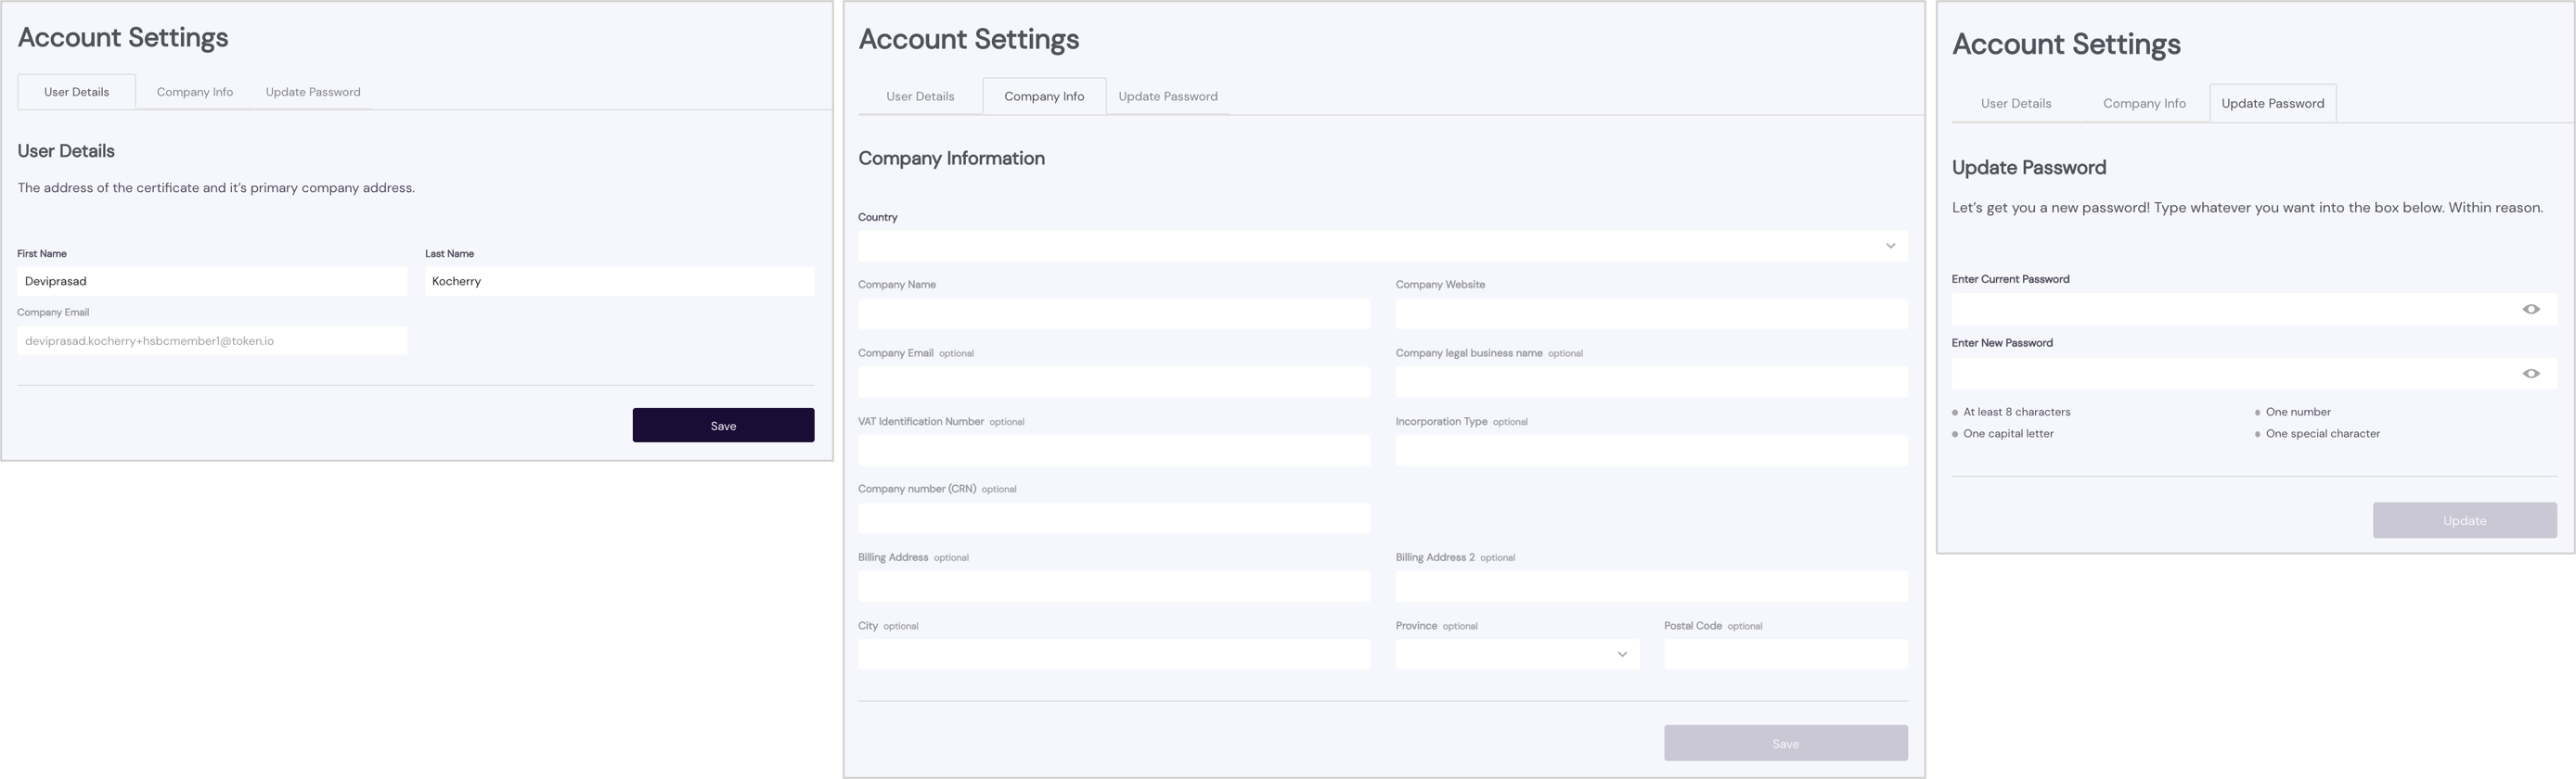
As indicated, passwords must include:
At least 8 characters
A capital letter
A number
A special character
When creating the password, pay attention to the allowed characters for special characters.
Be sure to save any changes you make.
With these settings you add and maintain your eIDAS-qualified SSL certificates for secure communications with connected banks via the Token.io cloud. Your organization needs to install SSL certificates onto its web server to initiate a secure session with browsers. Then, when connection is established, all web traffic between the web server and the web browser is secured. Hence, when a certificate is successfully installed on your server, the application protocol HTTP changes to HTTPS, where the ‘S’ stands for ‘secure’. Obtain your certificates from a trusted CA. If you are supporting PIS, you will need one certificate for payments and a second certificate for refunds/reversing payments with banks that support the refund feature.
Typically, an applicant for a digital certificate will generate a key pair consisting of a private key and a public key, along with a certificate signing request (CSR). Key pair and CSR generation are usually done on the server or workstation where the certificate will be installed, and the type of information included in the CSR varies depending on the validation level and intended use of the certificate. Unlike the public key, the applicant’s private key is kept secure and should never be shown to the CA (or anyone else).
After generating the CSR, the applicant sends it to a CA, who independently verifies that the information it contains is correct and, if so, digitally signs the certificate with an issuing private key and sends it to the applicant.
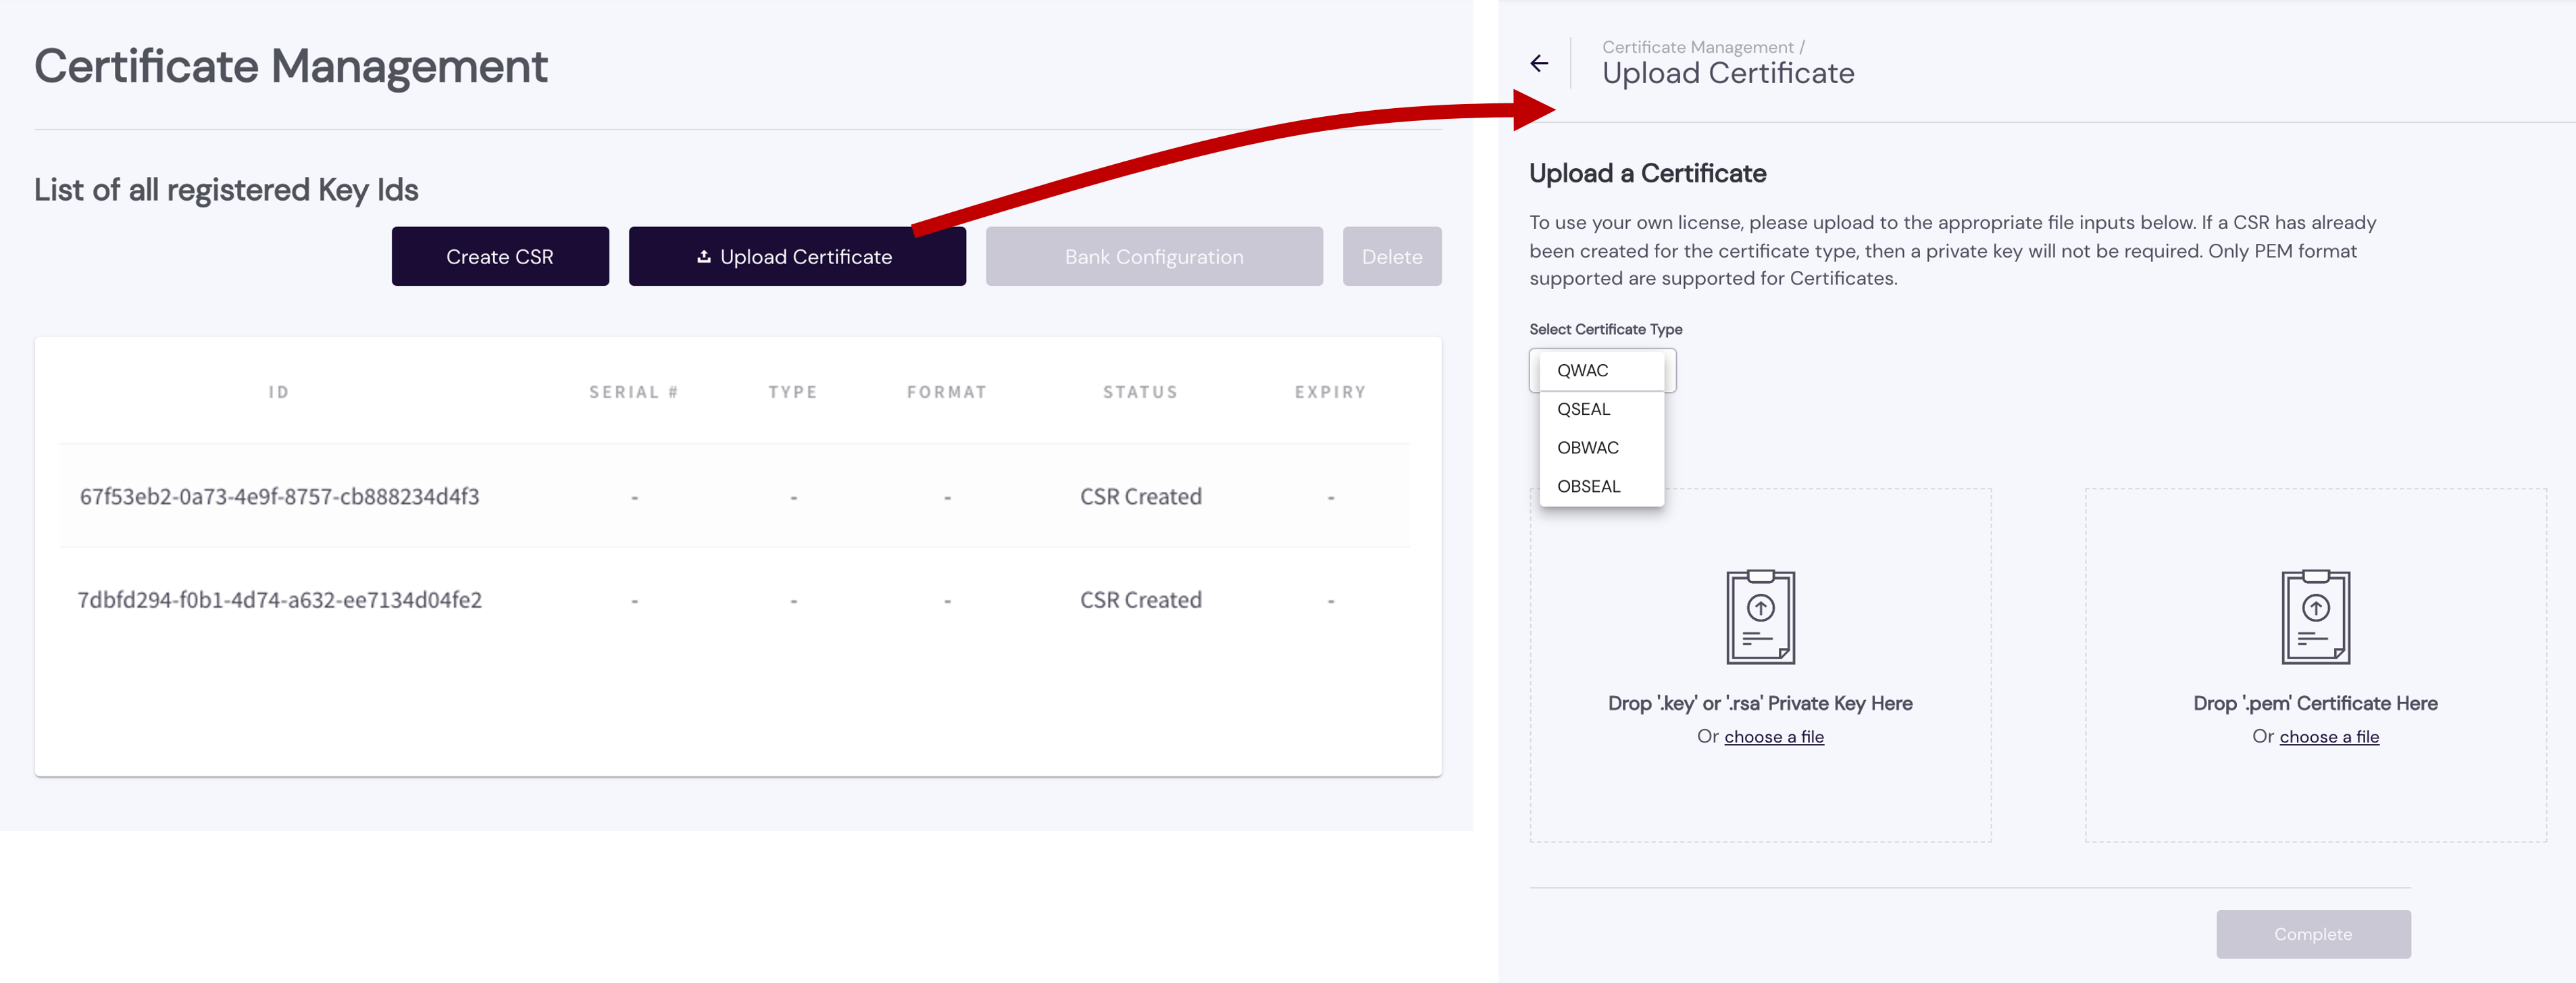
With the dashboard's Certificate Management setting you can create a new CSR or upload an existing certificate. When you add a certificate, it appears in your List of all registered Certificates, which indicates its ID, SERIAL #, TYPE, FORMAT, STATUS, and EXPIRY.
Certificates that follow the X.509 standard contain a data section and a signature section. The data section includes:
- Distinguished Name (DN) of the entity that owns the public key
- DN of the entity that issued the certificate
- Period of time during which the certificate is valid
- The public key itself (e.g., 3048 0241 00C9 18FA CF8D EB2D EFD5 FD37 89B9 E069 EA97 FC20 5E35 F577 EE31 C4FB C6E4 4811 7D86 BC8F BAFA 362F 922B F01B 2F40 C744 2654 C0DD 2881 D673 CA2B 4003 C266 E2CD CB02 0301 0001).
See the following topics under Managing Certificates for additional guidance on obtaining and uploading certificates:
The Configuration controls customise your Hosted Pages, Multi-Factor Authentication and webhook URL.
If you use the dashboard settings discussed here to configure the Hosted Pages, you will not need to populate the customizationId in token request payloads.
If you don't use the dashboard to customize the Hosted Pages, you can create Hosted Pages customization with a call to the POST /customization endpoint. However, you will then need to specify the customizationId returned in the POST /customization response in each subsequent token request payload (payload.customizationId).
Under General you can set your Hosted Pages Display Name. This is what the user will see on the consent page when redirected to the Hosted Pages. If you don't specify a Display Name, your memberId is used by default.

Webhook allows you to subscribe to certain events, as listed in the screenshot. When an event is triggered, a HTTP POST payload is sent to the webhook's configured URL.

Web App v2 allows you to customise the Token.io Hosted Pages.
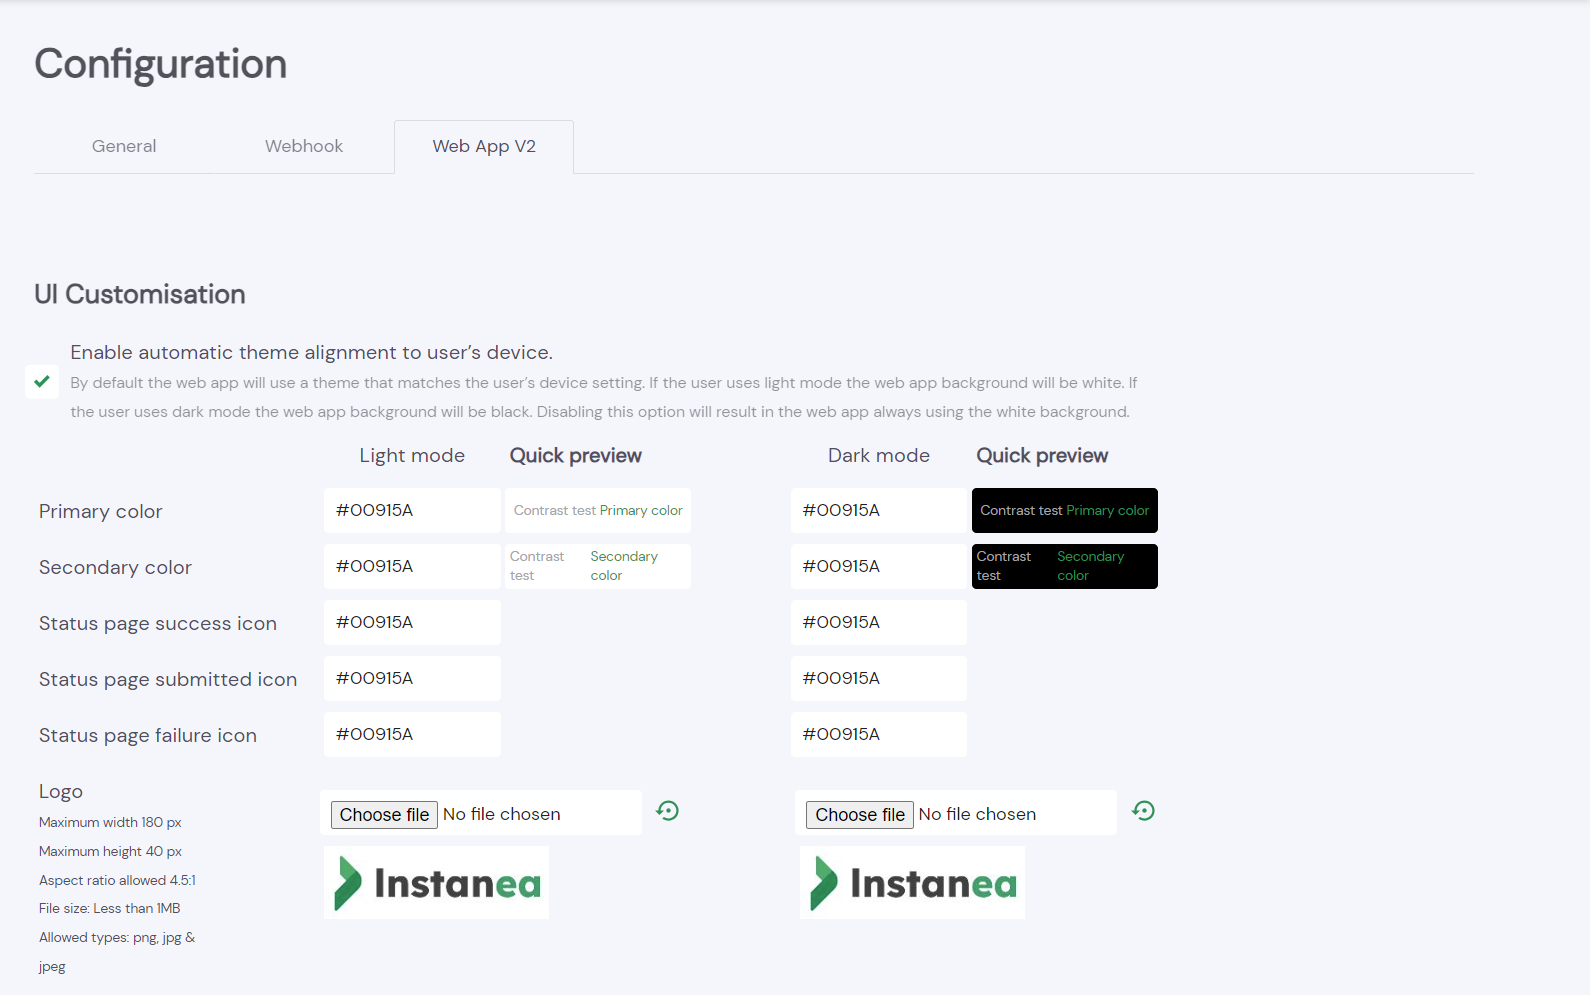
See Create custom Hosted Pages for more details.
Authentication Keys enables you to generate an API key or upload a public key to build your authentication header.
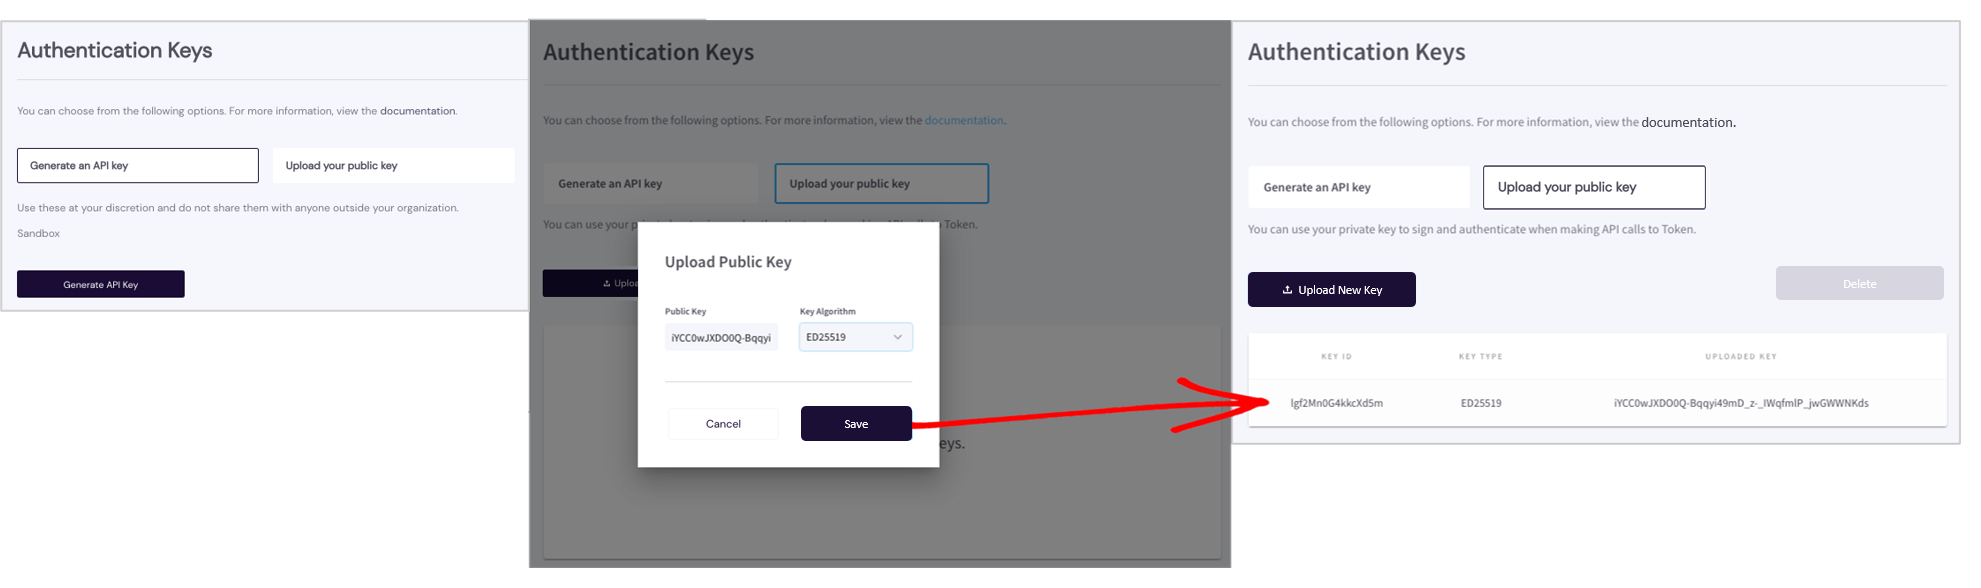
See Authentication keys for additional guidance.
Member Information contains your Member ID, Alias, Token.io Public Key. You can view the information here, but you are not allowed to alter/modify it. This is simply a handy reference point in case you forget or misplace your Member ID, Alias, Token.io Public Key while working in your IDE.

Under this setting, you restrict your beneficiary accounts. These are the bank accounts you will use as transfer destinations for authorised customer payments. You can Add, Modify, and/or Delete beneficiary accounts under this setting. Not required in the sandbox.

The Demo Store is a testing and presentation tool that simulates real-world payment flows using the Host Payment Page (HPP). It allows you to preview, configure, and share realistic payment experiences before you go live.
Use the Demo Store in the environment that matches your TPP Dashboard member:
- Sandbox: https://hosted-pages-demo.sandbox.token.io/en
- Production: https://hosted-pages-demo.token.io/en
You will need separate member accounts in Sandbox and Production.
Enable Demo Store
In the Dashboard, go to Settings -> Configuration -> Web App V2 and enable the Demo Store setting for your member. This generates a Demo ID tied to your configuration.Launch Demo Store
Open the Demo Store in your browser and enter your Demo ID in the configuration overlay.
Realistic Use Cases
- E-commerce checkout
- Wallet top-up
- Credit card repayment
Customisation
- Launch method: modal or redirect
- Currency: EUR (€) or GBP (£)
- Language: English, French, Italian
- Destination account: provide IBAN/BIC (EUR) or Sort Code/Account Number (GBP)
Branding Options
Upload your logo, configure primary/secondary colours, enable onboarding screens, and preview light/dark mode.Mobile Ready
Share the link and demo the payment flow on any mobile device.
- Choose a use case (E-commerce, Wallet Top-up, Credit Card Repayment).
- Enter an amount and launch the HPP.
- Select a bank and complete the payment in the sandbox environment.
- View success and failure outcomes.
For testing, we recommend these sandbox banks:
- United Kingdom: NatWest
- Other markets: Contact your Token representative for the latest recommendations.
- Use the Demo Store to showcase payment flows to your team or clients.
- Adjust branding and configuration until you’re happy with the experience.
- When ready, move to production using your live member configuration.
The dashboard also provides convenient access to valuable external resources.
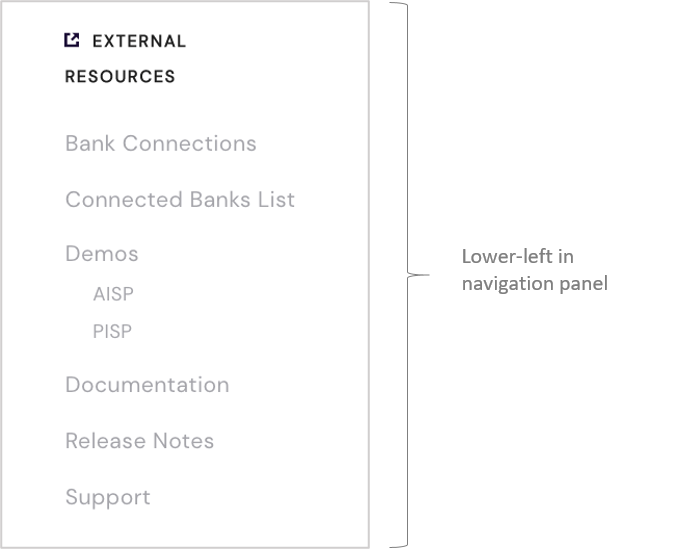
Hence, wherever you are in the dashboard — Dashboard Home, Sandbox, Activity, Users, or Settings — you can link to these resources and open them in the same or a new browser window/tab. These include:
You can view a summary report on the current health status of connected banks by clicking Bank Connections in the navigation panel, and then filtering the list by country, a particular search string, AIS status, PIS status, or both.
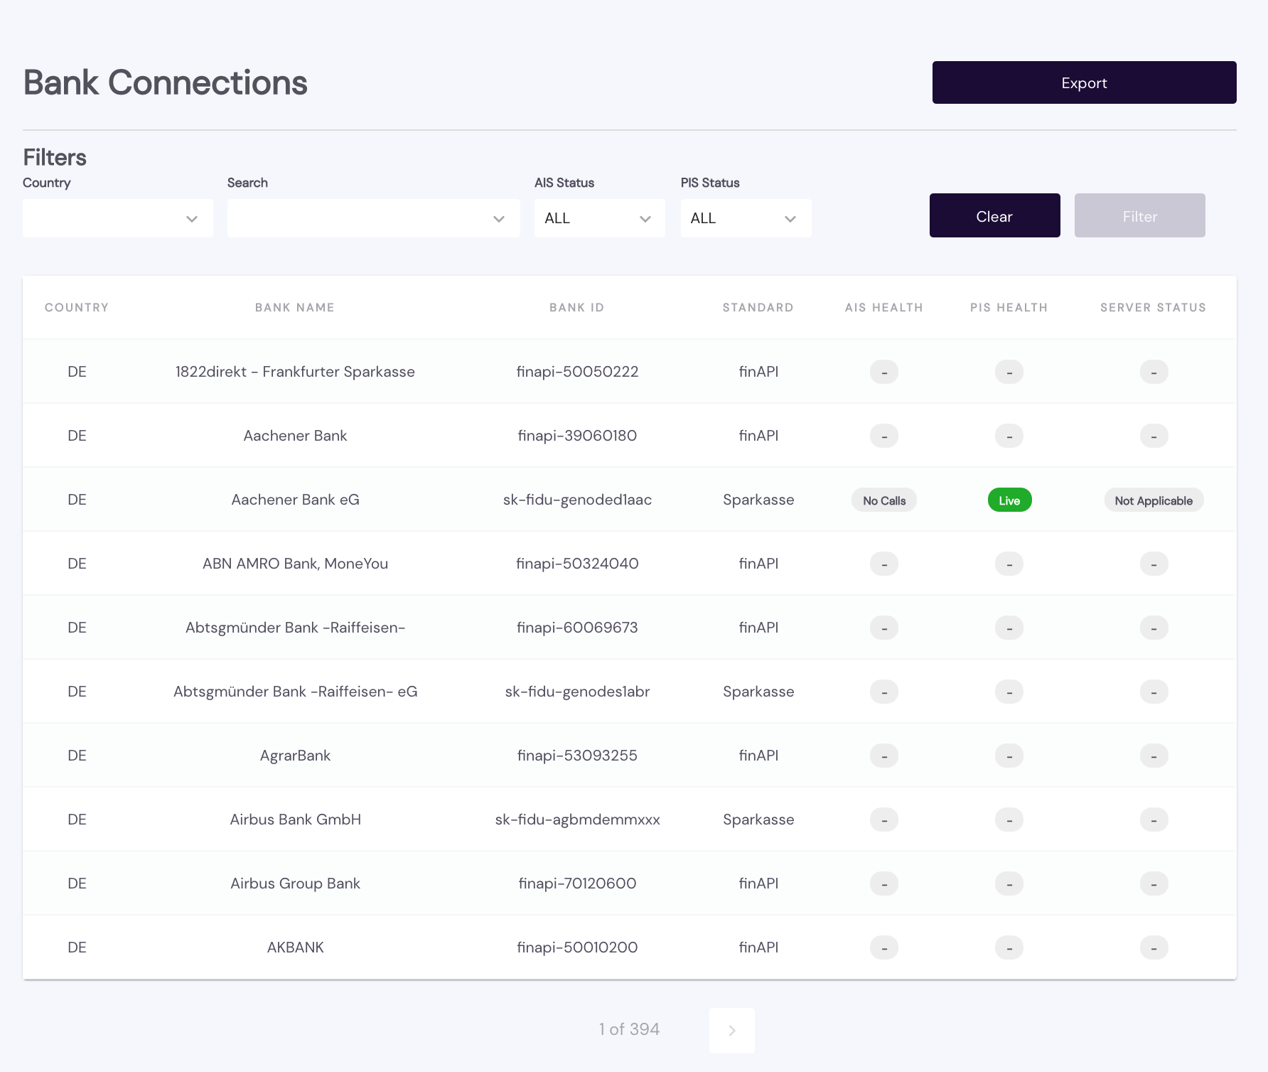
For each bank in your filtered list, you can check on its respective health status — LIVE, DOWN, or NO CALLS, defined as follows:
LIVE– bank is currently connected, accepting API calls, and returning appropriate responsesDOWN– connection interrupted; the bank cannot currently accept API calls for this serviceNO CALLS– the bank does not support API calls for this service.
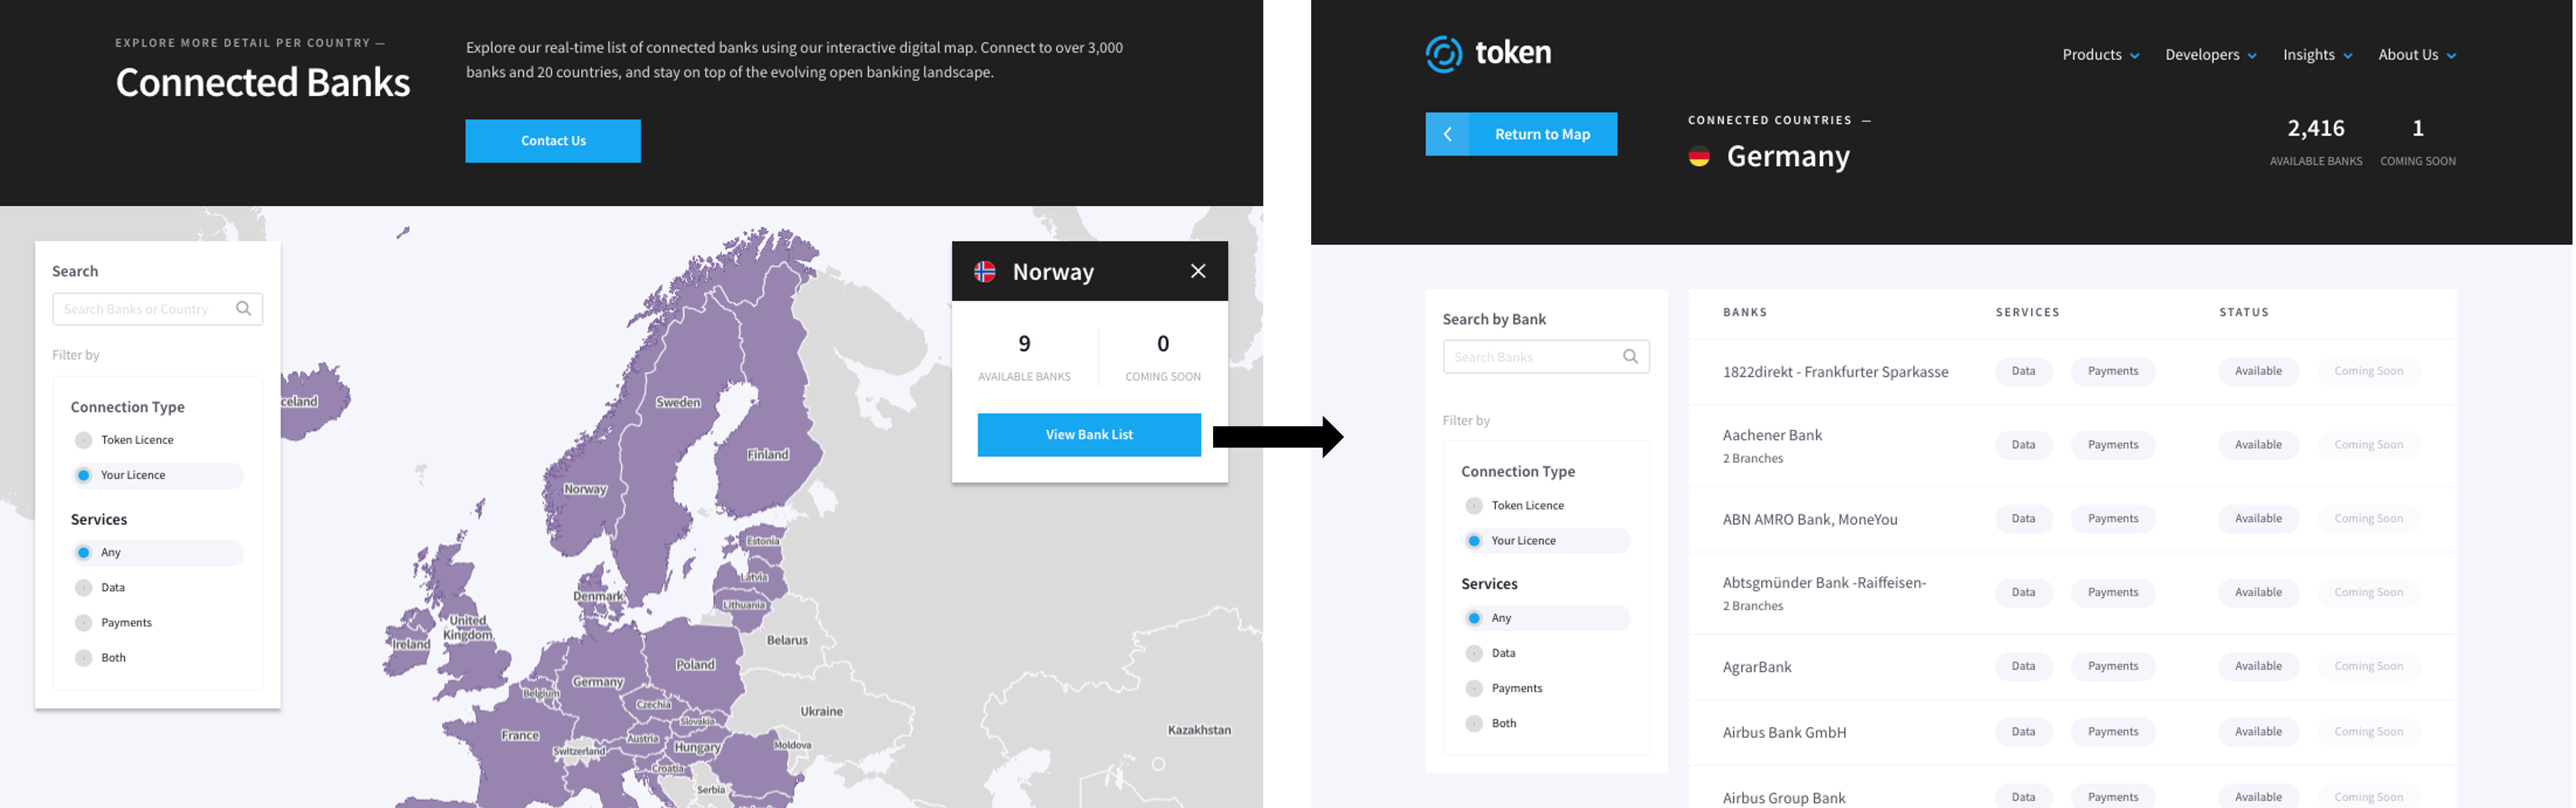
Access the complete list of Token.io-connected banks, organised by Connection Type and Services. Just click on a purple-coloured country in the map to reveal the number of Token.io-connected banks located there. Click View Bank List for an itemised listing of the available banks in the selected country, along with the each bank's Token.io-supported SERVICES and current STATUS (Available or Coming Soon).
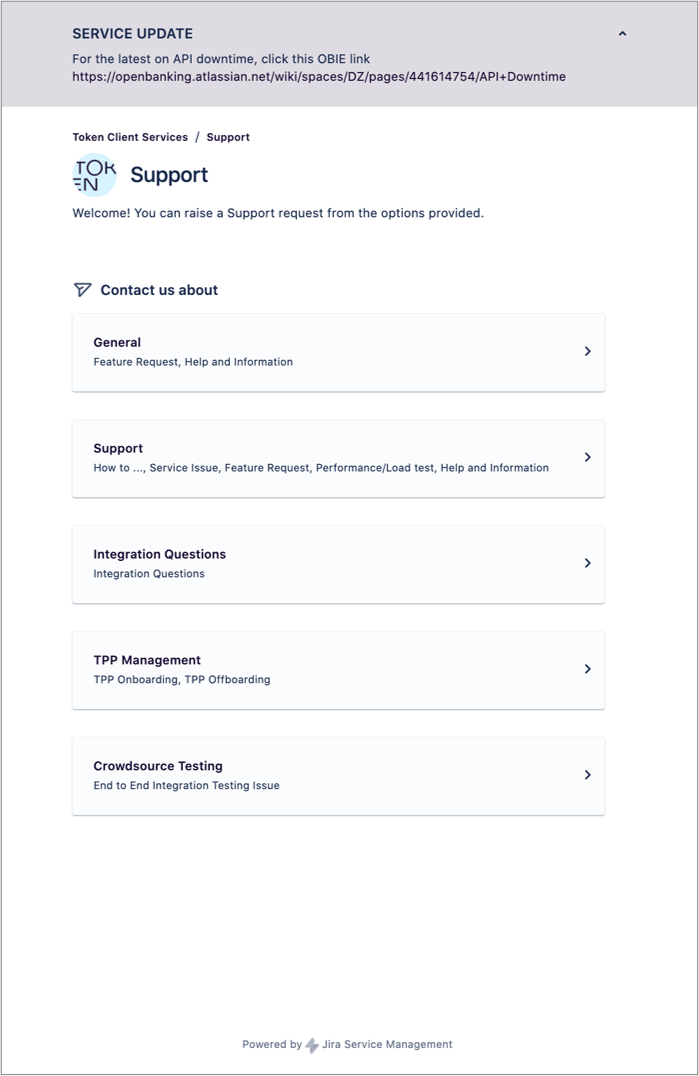
Link to the Token.io Support portal to raise a request with our support team.
If you have any feedback about the developer documentation, please contact devdocs@token.io